Friday, March 22, 2024

Days tick by......

 With less than a month to go it seems we have lots of solutions which are all but ready to go. Line followers that can see lines but can they drive seven metres in a straight line? Square finders that can see the squares, but can they drive to one and then the next? All will be revealed on the 21st April in Cambridge but for now here's some progress.

The Lava Palaver line detector works well but instead of a fixed mount, needed a bit of adjustment so has now been given an articulated mount.


This has been 3D printed to be integral with the magnet attached battery box cover. More magnets have been deployed to the rear part of the robot for quick change attachments for shooting zombies and collecting barrels.


It's great to see the layout before dozens of wires obscure the view!!!! More uses for magnets has been found in adjusting the barrel handler. 


This also makes it quicker and easier to change the types of attachment to see which works best. 


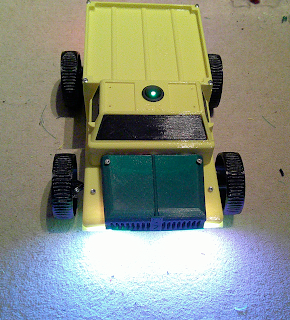
This is our barrel handler in serious searchlight mode. It obviously works but needs a bit more software behind it to get barrels to their destination. 

More on this to come. 

The Escape Route challenge still needs a bit of work, but we're working from an old formula so it's more tidying up than new development. To get cleaner lines on the robot we've hidden a VL53 laser range finder inside one of the cab windows, along with IR sensors on the sides and an ultrasonic sensor on the front of the robot.


When not in use we'll be closing the window with bluetack!!!!

First experiments with the sensors aren't perfect, as the following video shows.


But after a bit of tuning and building a test course, it's starting to look the part.


This is our goth themed video selection but we just need to get this running a bit more smoothly.

 We've had a solution for Minesweeper for sometime, but we've only just now got round to fitting it to the robot. 

It's an overhead gantry mounted camera which reports an XY co-ordinate of the red illuminated square on demand from the robot. The robot will be running on mecanum wheels for this challenge and the gantry is adjustable to keep the robot within the height limit of 450mm. Navigation is all relative to the red square, so, see a red square and drive to it!! To reduce the impact of the gantry on the image, 4mm black carbon fibre rods have been used for support. Also in the picture is the carry handle for the robot, to make handling easier and safer. A better view here.


With a variety of configurations needed for the competition day, a new control panel is being created for the rear of the robot which will allow the robots Pi to be quickly switched between challenge modes, as well as a battery monitor and a start/stop button. To make sure we've got everything covered for each challenge configuration, we've started a checklist, I'm sure it'll get longer soon!!! Here's where it is now.

Challenge: Lava Palaver
  • Wheels: 105mm
  • Bonnet: Line Detector
  • Back cover: Plain
  • Attachment name: LINES
Challenge: Zombie Apocalypse
  • Wheels: 70mm
  • Bonnet: Plain
  • Back cover: Nerf Gun
  • Attachment name: ZOMBI
Challenge: Eco-Disaster
  • Wheels: 70mm
  • Bonnet: ???Not yet determined???
  • Back cover: Barrel Picker
  • Attachment name: ECODI
Challenge: Minesweeper
  • Wheels: Mecanum
  • Bonnet: Plain
  • Back cover: Camera Gantry
  • Attachment name: MINES
Challenge: Escape Route
  • Wheels: 70mm
  • Bonnet: Ultrasonic detector
  • Back cover: Plain
  • Attachment name: None
Challenge: Pi Noon
  • Wheels: Mecanum
  • Bonnet: Balloon attachment
  • Back cover: Plain
  • Attachment name: RC
Challenge: Temple of Doom
  • Wheels: 105mm
  • Bonnet: Plain
  • Back cover: Plain
  • Attachment name: RC
Next time we hope to have more demonstration videos of being fully ready for all challenges.....but then again maybe not!!!!


Friday, March 8, 2024

Zyderbot inspiration

Zyderbot Inspiration


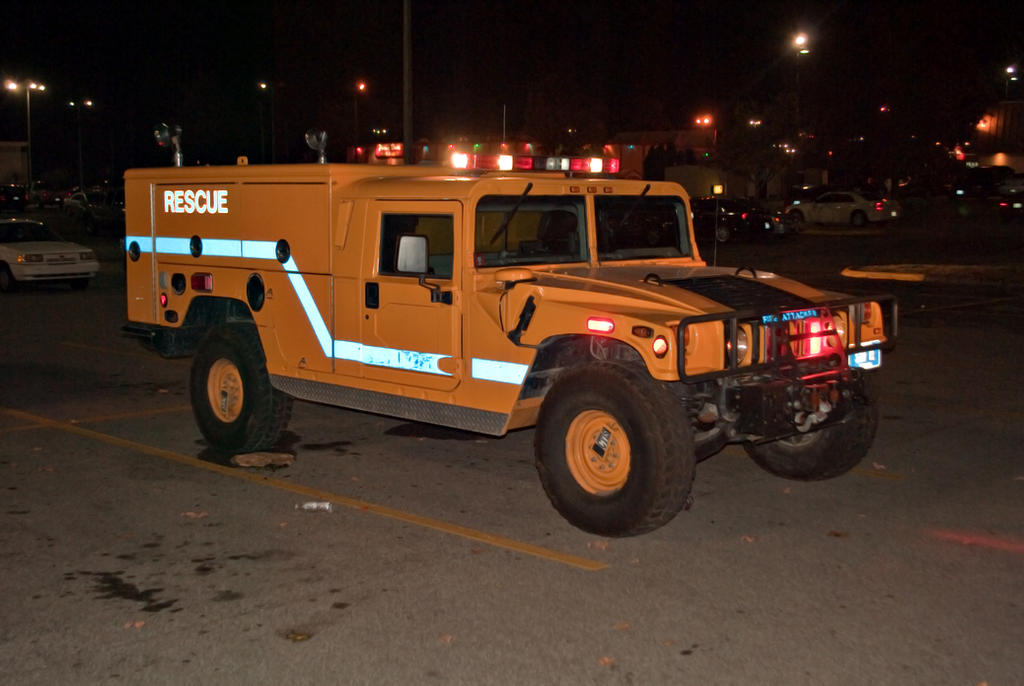
So this is what the 2024 version of Zyderbot is based around, a Hummer disaster rescue truck, though for PiWars rescues the design doesn't quite work and we need appropriately sized wheels to cope with obstacles.

Working with one competition robot means that it needs to be adaptable for each of the challenges, and this involves wheel and accessory changes. To make this standard and easier, USB connectivity has been adopted for connectivity of accessory processors and sensors.

The picture shows the optical line sensor mounted on the bonnet and connected by USB. There are a few additions to this for handshaking but the idea is to be as straightforward as possible. 

To make accessories quick-change, they are designed with magnets to hold them in place.


Here is a bonnet for the Pi-Noon challenge with four magnets fitted and the holder. 


The chassis has four corresponding magnets to which the bonnet is attached. It also gives easy access to the battery compartment!

Eco-Disaster
While the chassis and controller are the core essential components, development of the accessories for some of the challenges needs a lot of coding instead. For Eco-Disaster, the camera sensor gives a development image to give reassurance that it's working as expected, and here are two images of barrels, one red the other green. The background colour is red indicating nothing of interest, white is a definite image detection, and violet shows up the reflections in the image due to uneven lighting.

The images look very similar because the sensor has to be instructed to switch between colours and gives a visual result based on what it's being asked to do, the controller only gets numerical information as feedback. The code for this is all in C++ and published on github here.

Writing the code is all very well, but it has to be used by the controller to steer  the robot and collect barrels. So here is our design for the barrel handler.


Two views of the barrel handler to be mounted on the rear of the chassis. It will reach out over the front of the robot during operation and be lifted out of the way when not required. 


There's lots of adjustment in the arm to allow tuning for lift distances but for most operations it will only need to lift a centimetre or so. It reuses one of the earlier Zombie gun mounts, so is over engineered for the task!!!


If you've read one of our earlier blog posts then you'll know there's a very large bearing inside the plastic gear casing which runs very smoothly and gives the mechanism a very smooth action.


Testing for challenges is difficult if the actual challenge course isn't available, so some sort of simulation has to be devised. For the Minesweeper challenge it's paper based.


This is plain wall paper, found hidden in the back of the garage, stuck together and cut to size with electrical tape to mark out the squares. The red square is three sheets of A4 red paper stuck together and to simulate the challenge, the square is picked up and moved to another square. When reading the challenge arena sizes, it's easy to take the space for granted, but this is the only place in the house that can accommodate the arena size, just!!!!

Time is starting to tick away, so probably more pictures of completed robots soon we hope!!!


Wednesday, February 7, 2024

New Year Progress - Pins and Needles!

Now well into the new year, we got together again to review progress and where we were. 

We now had two Zyderbots to practice with and a visitor from another team, Phil from PiDrogen, came to play too.

Of course most of the meet was about Zyderbot and exchanging what we'd done so far. 

Getting the right version and configuration of OpenCV working on the Raspberry Pi platforms had been a significant task, if only for the compilation time involved. Difficult to show that in a blog, so here's some pictures of laptops with running code. 


This is our idea of a zombie for training the recognition engine. We'll have to revisit this on the day when we get to calibrate against the actual competition zombies.

We didn't get an updated demonstration of the Zombie gun though, the experimental use of solenoids for the trigger mechanism now reverting to more powerful servos for reliable operation. 

The line follower for the Lava Palaver has now reduced to a single camera sensor which detects the white line position, the course 'bump' and the end of course, sending out positional data to the controller on request.. 


The picture shows a streamed version of the detector output which actually slows it down quite a bit but gives confidence that it's doing what it's meant to, here showing three detection zones. Turning the image update and streaming off improves the response time dramatically and isn't necessary for the actual challenge but gives confidence that all is working as it should.

The sensor for the Minesweeper challenge is the same design as the line detector but with a different mounting and software setting. It wasn't setup for demonstration at the meeting, but works on the same principal, reporting the observed relative position of the red square to the controller. The following picture is a test view of what it 'sees'.

This is an uncalibrated image of a red A4 sheet on a noisy floor, we don't have an illuminated 'disco' floor to test it on! It's also surprisingly undistorted for a 160 degree lens, I'm sure the final version will 'fix' that! Code for this sensor will be on Github here.


A lot of the afternoon was occupied with High Noon and we were intending to have some practice with the PiDrogen robot Firefly, but we didn't have a compatible controller so it became a Zyderbot vs Zyderbot challenge. 

Wire coat hangers are becoming more scarce, but we found a couple of ex dry-cleaning hangers and  cut them to size. 

Using bolt cutters might be overkill but works!


We now had the 'official' wire mount and both robots were duly equipped. 


The video is of Phil from PiDrogen vs Colin from EastDevonPirates trying out their skill. We really didn't have enough balloons but we had fun, quite a bit of skill to acquire yet though. It was also a try out of mecanum vs tank steering as the two robots dance inexpertly around each other.


What we now need is more practice and a lot of balloons!


Finally, we took a team picture, might have to do another one, bit of an odd distortion!


Next up will be smaller team meeting to ensure we have solutions for each challenge and possibly some technical info!


Thursday, January 4, 2024

Zyderbot 9 - A Thoughtful Rebuild - PiWars 2024

Firstly, we have now moved from being a PiWars 2024 reserve team to being in the competition.  It may have seemed like we already were, but now it's official.  

These are a few pictures of the build/rebuild of our robot entry Zyderbot. We wanted two so that we could practice for the High Noon challenge and a rebuild also tidies up the ragged edges of quick modifications that accumulate along the way.

To start, a new design and layout for the front component base.

And with a components attached, from the top, 12V distribution, regulator and LiPo battery box.

Beneath this is the front chassis. The two brushless motors are shown mounted, and the central tunnel is the fitting for the rotation axis of the suspension. 

Next up is the fitting of the cab cover with the battery bay exposed.

And again with the bonnet/battery cover screwed on and a couple of wheels fitted.

The rebuild took a break over Christmas, but was soon underway again afterwards. Always good to see a tidy construction area!!!

While Zyderbot will complete most challenges autonomously, the remote control will be provided by a helicopter RC controller and associated IC's

Once breadboarded, the final circuit is constructed on a piece of stripboard. For the curious, this is a FrSky SBUS receiver / transmitter feeding an SN74AHC14N Schmitt trigger inverter at 5 Volts then a KeeYees level converter to get 3.3 Volts for the Pico

The rear layout of Zyderbot is a separate section with it's own layout.

And with the components fitted. It can look neat until the wiring starts!


Initial wiring, with USB being used to connect Pi and Pico.
Oh dear, it all does something but covering it up for sanity's sake is advisable. 

Completed, here it is, a new build. On/off switch relocated to the top of the cab for easy access, front headlights to evenly illuminate targets. Bonnet colour changed to avoid conflicts with a 360 degree camera looking for red squares.

The rear view, we like to know what voltage our batteries are at!!!!

Christmas rebuild task complete, on to challenge solutions!


Saturday, December 23, 2023

Show and tell December meeting - PiWars 2024

 And the next update meeting. It might seem to be quick on the heels of the previous meeting but that was just the delay of the blog writer getting on with it.

Not a full meeting this time due to illness, it's been going round the team, so we didn't see any progress in the nerf gun mount but we did look at what the zombie ideas might look like and a trial camera mount of for the minesweeper challenge.

Firstly a small update on the lava palaver challenge.


Apart from just a reprint of the front attachment, the ball bearing skids have been replaced by two jockey wheels to cope better with small steps in the course and for the 'bump'. The microswitch is still in place for the physical bump detection but will be replaced by an optical switch when the hinge is remade.


For this iteration, the line guidance is still using IR detectors in two rows, to improve resolution using off the shelf parts but it's likely that a camera interface will be used finally.

The image recognition for the Zombie Apocalypse and Eco-Disaster challenges moves on with good recognition and aiming now achievable. 


These are recognition tests as well as calibration screens, we're guessing at what zombies look like. 

Finally we have built a basic overhead camera detector for the Minesweeper challenge to check the calculations on being able to 'see' the whole arena.

Here the 160 degree camera is mounted at 350mm above the surface, which gives a 600mm radius surrounding view. Raising the gantry to 450mm extends this to a 800mm radius.


This is a bit ungainly but does demonstrate the approach to view the whole 1600mm square arena in one image for processing. For the next meet we'll be aiming to get that extended as well as some line following and mine hunting code.


Saturday, December 9, 2023

Minesweeper - PiWars 2024

The Challenge

The Minesweeper challenge requires the competing robot to reposition itself  to one of sixteen squares in a 4x4 matrix when that square is illuminated as red from the normal white. Covering any part of the square with the robot counts as covering it. and thus mine found. Once the robot has remained over a square for one second, then another square is randomly selected and illuminated, to which the robot must move next.


A total of 20 squares can be illuminated for each robots run and a run ends after either 5 minutes or all 20 mines have been found. If all 20 are found then the time taken to complete the run is recorded and points awarded to the robot according to the formula system

There are points awarded for each square found, 50 for autonomous robots and 35 for remote controlled robots. All competitors get 150 points extra for finding more than 10 mines. Just for competing, autonomous robots get 250 points, so entering as autonomous is worthwhile even if the robot can only move briefly. There are therefore a total of 1550 points available for autonomous robots and 1300 for remote controlled robots.

Analysis

Using conventional wheels driving to a square will require first steering, and then driving. Using tank steering this would be a simple manoeuvrer, but with Akerman steering this could become more complex and in the confines of the 4x4 matrix more longwinded. The use of mecanum or omnidirectional wheels would make moving to a square more direct as the robot only has to set the drive parameters to move in the correct direction. Sticking to the intersections would mean that the robot would only have to move the minimum distance to succeed in finding a square and also covering the central intersection equally as effective. 

For remote control and autonomous robots, once a robot has gained an aligned position over an intersection, instead of analogue steering, commands could be to move 400mm on the required vector simplifying actions and potentially making the robot more reliable.

Each square is 400mm on each side so a robot positioned on an intersection could cover four squares. With a random selection, if a robot can get itself parked on one of these intersections then there is a 1 in 4 chance that the next illuminated square is already covered. A not unreasonable tactic for an autonomous robot is to drive between these intersection points in a circular motion, stopping when it's detected that a square is illuminated. This could be a slightly more complex line following algorithm, ignoring other lines and stopping when the colour change is detected. This strategy would assist any type of steering. If it takes a robot 10 seconds to do a circuit of the squares, 3.2m, it might be expected to complete all 20 squares in less than 100 seconds.

Detecting a red square versus a white square for autonomous robots is a matter of both detecting the red and it's position. If the action of the robot is to actively search for the red, as in the intersection follower above, then the mechanism is built into the movement and detectors built into the corners of the robot might be expected to be enough. 

The detector above will give a precise colour measurement. Simpler detectors could be devised, with say an LDR covered with a green or blue coloured filter, and would give a good signal and no signal if over white or red, dodging the black lines as it goes!  A one minute calibration period is allowed for each robot before each competitive run to allow for adjustments so any detector can be optimised. 

Using this method also needs the dimensions of the robot taking into account and the detectors may need to be a permanent feature of the robot.

A popular choice may be a colour camera which can be used in simple or complex ways. Again, deploying a separate camera to the corners may be an effective way of determining the position of the red square when the robot passes over it, though may be more complex than imagined. Mounting a camera in a single line of vision would require the robot to reposition itself to find a red square, and then drive the robot to locate it. This may be effective but also time consuming as the robot searches and illuminated squares close to the robot may be difficult to see. Placing the camera on a rotating platform may help, though some additional engineering may be required, but would speed the process as only the camera would have to be used to locate a red square and a tilt mechanism could be used to view squares close by. 


Placing a camera high above the robot would give a better overall view of the arena and thus make the task of finding an illuminated square easier. If this camera were also a wide angle camera and positioned pointing straight down, then it could feasibly observe the whole of the arena and thus detect a lit red square without movement. For a robot navigating to a square using this camera method the task is easier because all that is required is that the navigation moves the red square as close to the centre of the cameras view as possible.

 If mounting the camera above the robot doesn't give an adequate view, or the camera angle isn't wide enough, the camera could be mounted on the top of the robot pointing upwards towards either a  plain or convex mirror. 

These are just a few ideas for solving this challenge, not sure which we'll use yet but the camera and mirror might be easiest, we'll just see what we do and might come up with another idea.