We aren't actually in PiWars 2024, but just a reserve team for the advanced category, which doesn't mean we don't have to do anything! Assessing the challenges and thinking about what's involved has to be done.
We've all been involved with a robot workshop so haven't had much time to look at these things in depth but here's a view on the first of the challenges listed, Lava Palaver. The official description of the challenge is here Lava Palava – Pi Wars
This is a black painted course 7 metres long and 55cm wide, with walls 7cm high and part way along is a double chicane where the robot has to turn right then left, followed by a left and then right. A white line 19mm wide is positioned along the centre of the course. Without attachments, the maximum width of a robot is 225mm, or half the width of the course.
A course like this has been used in previous years, but as a change to the layout, a 'speed bump' will be inserted onto the course on the day of the competition, dimensions shown below.
This one feature does introduce a range of considerations also applicable to the obstacle course challenge covered later. The overhang on a robot, that part of the chassis ahead of the front wheels or tracks, will need to be able to clear the leading edge of the 'bump' and also once traversed, be able to avoid colliding with the level part of the course when coming off the 'bump'. A robot could, of course, be made sufficiently robust to collide with this and continue on, either with strengthened chassis, the addition of a skid or with a leading idler roller or wheel. The table below lists a range of overhang lengths and clearances required.
There are several strategies which come to mind, and may be adopted either individually or combined. These are dead-reckoning, wall following, line following and for the second and third runs, memorised tracks. Collision avoidance, while not a navigation strategy, is desirable so will be included!
Dead-reckoning
As the shape of the course is known, separate routines could be incorporated into the robot navigation code to drive the robot in different ways depending on the assumed position of the robot. Therefore, the routines could be for example.
Drive-forward-2.5-metres
Turn-right-45-degrees
Drive-forward-700mm
Turn-left-45-degrees
Drive-forward-1-metre
Turn-left-45 degrees
Drive forward-700mm
Turn-right-45-degrees
Drive forward-3-metres
These descriptive routines could be taken to successfully navigate the centre of a course, without reference to the 'speed bump'. This is not the shortest route of course and starting the robot already close to the right-side wall and navigating close to the left hand wall through the chicane, returning to near the right side wall on the lead out would be shorter and thus faster for a robot with similar speed capabilities. Robots with a chassis width less than the maximum would be able to take best advantage of this strategy.
Dead-reckoning has been done successfully with timed robot runtimes, but works more reliably when the wheel dimensions are combined with measured rotations of the wheel to calculate the distance accurately. Similarly, robot direction can be estimated by relative wheel rotations (combined with wheel orientation depending on steering method). A robot using mecanum wheels could simply move at a required angle without changing orientation. Gyroscope/accelerometer circuits can be incorporated to provide even more orientation information.
On a simple course such as Lava Palaver, dead-reckoning can provide an effective method of autonomous completion. The assumed measurements in the example could be confirmed on the day of competition, and corrected by physical measurement of the course. This could also include the position of the 'speed bump' to accommodate any speed/power variations which might be needed. Including collision avoidance to improve the usefulness of the estimations input will aid the navigation.
Wall following
The course has a wall on either side, and while colliding with either wall might reduce the score, and time, available, it does offer a consistent guidance reference throughout. Detecting walls can be done with a variety of non-contact technologies, such as ultra sonics, laser and infrared (IR) distance measurements.
Ultrasonics
Detectors are mounted on the sides and front of the robot and provide a reading how long an ultrasonic pulse of sound takes to reflect from a surface. These can be either self contained, carrying out the measurement and providing measurement information, or controlled by the robots controller and the timing and subsequent distance measurement calculated directly. These detectors can be prone to errors due to the angle of the surface they are facing and the level of reflectivity, hard surfaces working best.
This is a very common low cost ultrasonic sensor, in this case, run from a controller.
Laser
In recent years, small laser equipped distance sensors have become available, such as the VL6180X or VS53L0X models, which can provide an accurate and fast measurement providing that the target surface is reflective enough. The surface of the course walls are painted black and this may significantly reduce the effectiveness of this type of sensor, but trying it may be a useful lesson. They also cost a bit more than the ultrasonic sensors, which may need to be taken into consideration when adding multiple sensors to a robot.
LIDAR (LIght Detection And Ranging) sensors are not beyond the budget of many robots (both in cost and size) and can provide a detailed map of a robots surroundings, but do need to be able to 'see' the course walls which may prove difficult to engineer a robot to do in this case.
This picture of a low cost LIDAR sensor is driven by an electric motor to give an all round view. It costs in the region of a good serial servo which many roboteers use.
InfraRed(IR)
These sensors rely on the level of reflected IR light from a surface, which is illuminated by an associated IR source. These can be very effective measuring small distances where the ultrasonic detector would fail completely but may suffer the same problems as the laser sensors when observing the black sides of the course.
This is a pair of IR sensors with adjustment for triggering sensitivity.
The following is an example sensor layout.
The rectangles describe the locations of the sensors for both wall following and collision avoidance and could be either ultrasonic, IR, or both. One option for the front collision detector is to mount it on a servo to provide a sweep of the area in front of the robot for greater coverage.
Line Following
The white line down the middle of the course provides an immediate point of focus for guidance being consistent throughout. Line following is a very common entrance subject to robotics and using error correction to establish a reliable guidance mechanism. Information about the position of the line relative to the robot and its directions is typically obtained via an array of point sensors or from a high resolution optical camera. There are also low resolution optical cameras available which provide a much simpler interface and image to analyse for guidance.
Point Sensor Arrays
These come in various types but are typically a light sensor and light source as adjacent pairs and provide a signal based on the reflectivity of the surface which can be used to detect a white or black line on a background black or white field.
Individual sensor, this is a TCRT5000
Here, eight sensors have been soldered to a sensor bar and an I2C interface provides access.
Some colour sensors can detect coloured lines to enable multiple lines to be used for different guidance uses in the same plane. A basic array would be two such pairs a short distance apart and mounted across the robots chassis at right-angle to the direction of travel. These give basic information such that when the right sensor is over the line, turn right, when the left sensor is over the line, turn left. Adding more sensor pairs enables the robot to more accurately determine the position of a line and placing them closer together enables a greater degree of granularity of control. Using two or more lines of sensors enables more directional information to be gathered, and varying the shape of the sensor array ( an arc can be beneficial) , together with varying the spacing of sensors to give both coarse and fine positional sensing can be helpful.
Positioning the sensor array ahead of the robot gives more time to make corrections, as well as placing arrays further back on the robot chassis to reduce over correction situations. They can also be useful with providing initial alignment at the start of a line following run ensuring that the robot is positioned as straight as it can be.
This is a basic two sensor layout which can be very successful but the line follower typically has low speed as it constantly has to hunt for the line it's following.
Adding a third central sensor provided focus, reduces hunting and increases the speed possible.
As with the commercial example above, this is an eight sensor bar. If the line is wide enough then the two central sensors can be the focus, but if it is a narrow line, then ignoring one of the outlier sensors and using the fourth sensor as the focus can help performance.
A nine sensor commercial sensor bar is unusual, but automatically provides for a central focus sensor. The wide sensor bar provides for an increased sensor sweep area when negotiating corners or having to perform line finding.
This is an enhanced nine sensor arrangement with a dense focus in the centre, allowing the robot to line follow using multiple sensors, perhaps not necessarily in the centre, but also has outlier sensors for improving corner performance.
This curved sensor is common n competitive line follower robots, maintaining a focus area and providing depth in the outlier sensors. This is very useful where the robot will be encountering many corners in quick succession.
This final layout is more extreme and might be more at home in a commercial robot but can still be useful in smaller robots. The central sensor bar provides the focus and the core steering input. The lead bar provides advance information to allow the controller to take predictive actions, and the trailing sensor bar provides some alignment information to help reduce crabbing and hunting of the robot as well as aiding aligning the robot in a straight line at the start.
High Resolution Cameras
While they can require significantly great processing power in a robot controller, the cost of adding a camera can be very modest and equivalent to a point sensor array. The processing may be more intense but effectively provides the same level of guidance as a multilevel array giving a degree of lookahead absent from single line sensors. Cameras can be mounted away from the surface of the course so can avoid being snagged on a 'speed hump'. Using cameras can give a very high quality of control but does require significant investment in learning to implement in code. A variation on this is to add a pan feature to the camera to provide additional lookahead capability.
Wide angle cameras such as this can provide a good view for line following but some compensation for the lens distortion might be needed for accuracy.
Combinations
Combining all these may be difficult, but a few would be very useful. Wall following can be a complete solution, but including it with the others for collision avoidance makes the extra points more likely and gives greater confidence in increasing the speed. Line following can achieve the whole navigation of the course, but adding the dead-reckoning information to it can aid in speed control, accelerating the robot from the start, slowing as a corner approaches and accelerating afterwards. Without knowing where the 'speed bump' is, a robot either must moderate its speed throughout or potentially risk crashing, however dead-reckoning can add a suitable speed reduction to safely navigate it.
Memorising and recall
Having completed one successful run of the course (we will all be successful!!!), we should have enabled our robot to do it again just as easily, but with the extra knowledge of having done it once. Recording the robots good run means that without sensors it should be able to do it again and perhaps faster. The distance to the corners is known, the 'speed bump' has been located and where the robot can and can't run at full speed determined.
The methods of recording a 'good' run are varied but the course isn't complicated so a small array of control points may suffice.
What will make for a good robot for this challenge?
The Lava Palaver is one of the challenges and going all out to win just this one thing may be the sole objective, but in PiWars, a robot chassis will need to be adaptable to the other challenges.
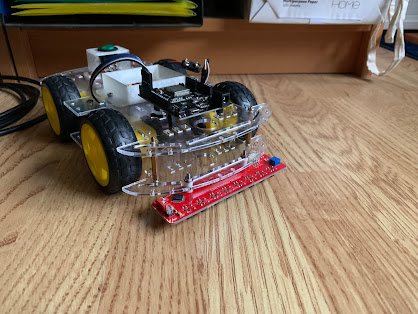
Adding a line follower array attachment will be perhaps the easiest option, but some mechanism may be needed to allow it to navigate the 'speed bump', fitting it with a hinge and either a roller or idler wheel for the time it is in contact with the 'speed bump'. Fitting this hinged part with a detector would also inform the robot that it had found the bump. Line following competitions sometimes feature quite extreme 'bumps' which delicate high performance robots just get on with.
Placing the array well in front of the robot with this mechanism would also perhaps give the robot a small amount of time to decelerate to navigate the bump safely. However, placing the array far in front of the robot may be a problem for steering depending on the technique involved.
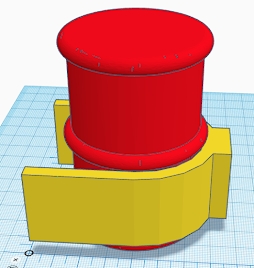
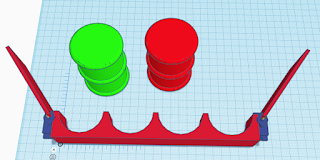
A few mock-up pictures of a suspended sensor running on ball castors. The spring provides suspension to hold the sensor bar down as well as accommodate the rise and fall of the bar.
A robot can be up to 300mm long in its base configuration, longer than half the width of the course so a mecanum wheel equipped robot could find itself colliding with the sides of the course at corners. Using skid or differential steering would offer a robot the chance to steer precisely but only if it was to slowdown to do so at corners. Ackermann steering would give the best control over the course at speed, but might prove problematical to use in the other challenges. One thing which would be consistent is that full length robots with attachments will be at a disadvantage on this challenge.
Remember: 70% of the points are available just for finishing the course without errors three times in 5 minutes, which isn't fast, so just that would be a good result for any robot entrant.


