Showing posts with label Micropython. Show all posts

Monday, April 1, 2024

Tuning!

 Tuning!

So we build solutions, they should work, and then the real world gets in the way. 

Lava Palaver progress

We'd gone for a camera sensor for the Lava Palaver challenge, not because it was a better option for following a line, but because it was automatically immune to the hump in the course. However, this threw up new issues. The competition course is 7m long and painted black, the only surface available for testing is a light wooden floor which makes for very poor contrast.

 Early testing was plagued with phantom readings from reflections which confused the robot, so testing moved to using a black line instead, with the intention of switching over to white for the competition day. This was much more successful, but space is a limit again. To make a test worthwhile, we're going to have to go for a bigger course outside, using a long roll of black art paper with white electrical tape down the middle and hope for dull days!

Illumination was oddly a very important feature. Off the shelf line follower attachments tend to be IR sensor based and have built in illumination which tends not to be noticed, but for the camera, even illumination is essential to get good contrast for the line, so the robots headlights have to be used to light up the track ahead, together with an overhead light illuminating from above. 


The result is a fairly simple bit of code at the end, but beneath it is a lot background code doing the heavy lifting and interfacing. 

One of the items outdoor testing might help with is coping with bright sunlight and shadow. Watching the competition from previous years, it's obvious that this can have a detrimental impact on robots using optical sensors so we'll be looking at that. It's hasn't been done yet but we'll be experimenting with a sunshade for the robot to give more even lighting for the camera and hopefully reduce errors.


Zombie Shooting
For the Zombie Apocalypse, we've had an idea to use a butchered standard nerf gun which looked very promising out in bits on a table, see an earlier blog post, but we discovered a weakness. Using the servo method of pushing the nerf pellet into the gun worked a lot of the time, but then would jam the gun requiring it to be dismantled to clear the jam, it wasn't suitable for the competition. This held us up for quite a while but an obtuse solution using a stepper motor and a rotating cam came to the rescue, so now we're back in business.


The video shows the cam operating and firing off a magazine of pellets. We then got a cat laser toy and pressed it into service to help with aiming, now how many competitors will be aiming at butterflies?


As the video shows, the gun fires to the left, a bit more work to do but on our way.:) 

Minesweeper
Again, this is one we had a solution to some time ago, but when we come to use it, there's a surprise for us. We're using an overhead camera, but processing the image in memory leaves off a lot of the arena, a 'feature' of the camera.


 The image was always going to be distorted but missing bits is a problem we haven't time to overcome, we'll just have to code round it. This means that the robot will have to search for the red square sometimes instead of just being able to see it and move to it. 

The algorithm for this will be basic, something like the following.


Just how accurate the movement will be isn't known, we were expecting to just move to the red square wherever it was, but this now requires some idea of where the centre of the arena is. Only testing will tell. We're doing this challenge on mecanum wheels. As the arena is 4 x 4 matrix, all red squares will be within it and so a map can be built of the arena based on squares that have already been red. Will this be good enough for the minimum 20 moves required we'll have to see. Anyway, signing off with an errant robot which finds it's square, and then ignores it, ho hum.


Friday, March 8, 2024

Zyderbot inspiration

Zyderbot Inspiration


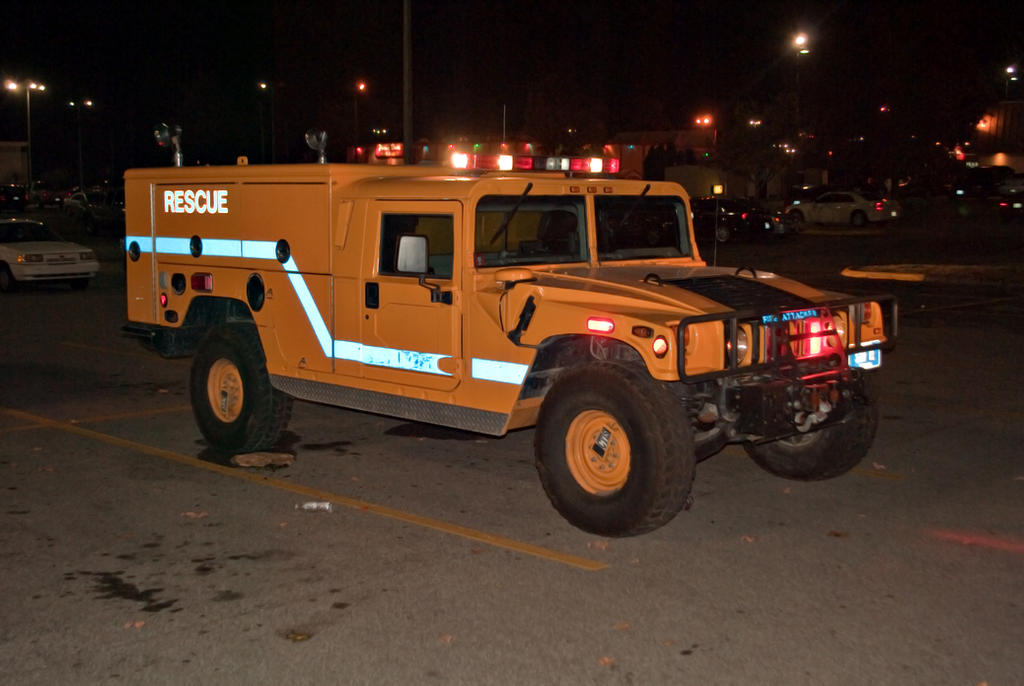
So this is what the 2024 version of Zyderbot is based around, a Hummer disaster rescue truck, though for PiWars rescues the design doesn't quite work and we need appropriately sized wheels to cope with obstacles.

Working with one competition robot means that it needs to be adaptable for each of the challenges, and this involves wheel and accessory changes. To make this standard and easier, USB connectivity has been adopted for connectivity of accessory processors and sensors.

The picture shows the optical line sensor mounted on the bonnet and connected by USB. There are a few additions to this for handshaking but the idea is to be as straightforward as possible. 

To make accessories quick-change, they are designed with magnets to hold them in place.


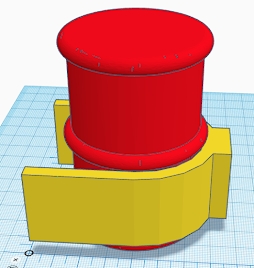
Here is a bonnet for the Pi-Noon challenge with four magnets fitted and the holder. 


The chassis has four corresponding magnets to which the bonnet is attached. It also gives easy access to the battery compartment!

Eco-Disaster
While the chassis and controller are the core essential components, development of the accessories for some of the challenges needs a lot of coding instead. For Eco-Disaster, the camera sensor gives a development image to give reassurance that it's working as expected, and here are two images of barrels, one red the other green. The background colour is red indicating nothing of interest, white is a definite image detection, and violet shows up the reflections in the image due to uneven lighting.

The images look very similar because the sensor has to be instructed to switch between colours and gives a visual result based on what it's being asked to do, the controller only gets numerical information as feedback. The code for this is all in C++ and published on github here.

Writing the code is all very well, but it has to be used by the controller to steer  the robot and collect barrels. So here is our design for the barrel handler.


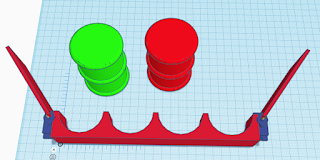
Two views of the barrel handler to be mounted on the rear of the chassis. It will reach out over the front of the robot during operation and be lifted out of the way when not required. 


There's lots of adjustment in the arm to allow tuning for lift distances but for most operations it will only need to lift a centimetre or so. It reuses one of the earlier Zombie gun mounts, so is over engineered for the task!!!


If you've read one of our earlier blog posts then you'll know there's a very large bearing inside the plastic gear casing which runs very smoothly and gives the mechanism a very smooth action.


Testing for challenges is difficult if the actual challenge course isn't available, so some sort of simulation has to be devised. For the Minesweeper challenge it's paper based.


This is plain wall paper, found hidden in the back of the garage, stuck together and cut to size with electrical tape to mark out the squares. The red square is three sheets of A4 red paper stuck together and to simulate the challenge, the square is picked up and moved to another square. When reading the challenge arena sizes, it's easy to take the space for granted, but this is the only place in the house that can accommodate the arena size, just!!!!

Time is starting to tick away, so probably more pictures of completed robots soon we hope!!!


Wednesday, February 7, 2024

New Year Progress - Pins and Needles!

Now well into the new year, we got together again to review progress and where we were. 

We now had two Zyderbots to practice with and a visitor from another team, Phil from PiDrogen, came to play too.

Of course most of the meet was about Zyderbot and exchanging what we'd done so far. 

Getting the right version and configuration of OpenCV working on the Raspberry Pi platforms had been a significant task, if only for the compilation time involved. Difficult to show that in a blog, so here's some pictures of laptops with running code. 


This is our idea of a zombie for training the recognition engine. We'll have to revisit this on the day when we get to calibrate against the actual competition zombies.

We didn't get an updated demonstration of the Zombie gun though, the experimental use of solenoids for the trigger mechanism now reverting to more powerful servos for reliable operation. 

The line follower for the Lava Palaver has now reduced to a single camera sensor which detects the white line position, the course 'bump' and the end of course, sending out positional data to the controller on request.. 


The picture shows a streamed version of the detector output which actually slows it down quite a bit but gives confidence that it's doing what it's meant to, here showing three detection zones. Turning the image update and streaming off improves the response time dramatically and isn't necessary for the actual challenge but gives confidence that all is working as it should.

The sensor for the Minesweeper challenge is the same design as the line detector but with a different mounting and software setting. It wasn't setup for demonstration at the meeting, but works on the same principal, reporting the observed relative position of the red square to the controller. The following picture is a test view of what it 'sees'.

This is an uncalibrated image of a red A4 sheet on a noisy floor, we don't have an illuminated 'disco' floor to test it on! It's also surprisingly undistorted for a 160 degree lens, I'm sure the final version will 'fix' that! Code for this sensor will be on Github here.


A lot of the afternoon was occupied with High Noon and we were intending to have some practice with the PiDrogen robot Firefly, but we didn't have a compatible controller so it became a Zyderbot vs Zyderbot challenge. 

Wire coat hangers are becoming more scarce, but we found a couple of ex dry-cleaning hangers and  cut them to size. 

Using bolt cutters might be overkill but works!


We now had the 'official' wire mount and both robots were duly equipped. 


The video is of Phil from PiDrogen vs Colin from EastDevonPirates trying out their skill. We really didn't have enough balloons but we had fun, quite a bit of skill to acquire yet though. It was also a try out of mecanum vs tank steering as the two robots dance inexpertly around each other.


What we now need is more practice and a lot of balloons!


Finally, we took a team picture, might have to do another one, bit of an odd distortion!


Next up will be smaller team meeting to ensure we have solutions for each challenge and possibly some technical info!


Thursday, October 26, 2023

Eco-Disaster PiWars 2024


 Something  to think about anyway, sorting 12 barrels by colour into two areas, autonomously, within 5 minutes. That's the PiWars 2024 Eco-Disaster Challenge detailed here Eco-Disaster – Pi Wars
Well we have to think about it, though we may never get to do it!!!

The Challenge

   The arena for this challenge is 2.2m square, with a central area of 1.6m square where the barrels are located, positions of which revealed on the day. 

    So, the challenge is to relocate the barrels, red for toxic, green for ok, to two areas, denoted as blue and yellow, scoring 80 points for the number of barrels relocated correctly, but loosing 40 points for incorrectly relocating barrels. There are extra points for part way completion, 50 for six barrels correctly sorted, and 150 for 12 barrels correctly sorted. Additionally, 250 points for completing the challenge autonomously, which as an 'advanced' team, we have to. As with other challenges where time matters, if all barrels are collected, additional points are awarded according to the formula system described here Formula Scoring System – Pi Wars. Thus, for completing the challenge correctly, and fastest, within 5 minutes this challenge scores 1510 points.


Approaches

   Here are three general approaches to the challenge, and the final one used may be one selected on the day depending on the layout of the barrels, or just a  mixture, but without a strategy then attachments can't be designed.

   As an alternative view, it's been pointed out that as an autonomous challenge earns 250 points, simply letting the robot stand still or spin on the spot might earn the points, as incorrect barrel placement, however accidental, will loose points.

   Assuming we're actually going to attempt the challenges, the first hurdle is identifying the colour of the barrels to be placed. An immediate option is a colour camera which has associated code to identify the colour correctly. If this is used then it's likely that this camera will also be used for navigation to the clean and contaminated zones, and preferably avoiding knocking over any of the other barrels.


      A less code intensive option is to use a colour sensor such as a TCS230, which can be tuned to identify the correct zone and barrel colours on the day. This would have to be used in association with a separate navigation system, such as an ultrasonic, laser or IR system. 


1. Individual Barrel Placement

    This requires that the robot locate each barrel, identify the colour, and then navigate across the arena to the correct location and place the barrel there. 

    At it's most basic, the robot could be fitted with a 'pusher', drive up to the barrel, push it around the arena and into its correct zone, then repeat 11 times. This does imply that the route to the zone is navigable and also that the barrel is in a position to be pushed, and hasn't been stuck up against a wall.

    The next step to this would be to have a barrel handler which will grip the barrel in some way allowing the barrel to be positioned where required. Attachment design ideas are in a later section.

   The arena design has allowed for free movement around the outside initially and a simpler strategy might be to drive the robot to one of the corners adjacent to the target zones and collect the barrels from that position where the other barrels would be unlikely to get in the way of a robot repositioning one.


2. Sweep Then Sort

   In this strategy, the robot makes two passes at barrel placement. 

   In the first pass, the robot uses a pusher, possibly of maximum width 325mm, to push all the barrels collectively  to the side of the arena containing the zones. This will immediately place some barrels in the correct zone and of course some in the incorrect zone, as well as a few outside a zone. This may appear to be a quick solution but it would probably take five passes over the arena to guarantee collecting all in this way which might reasonably take 1 minute. 

   In the second pass, the robot then begins to sort the barrels, now against  one arena wall, either moving an incorrectly placed barrel to the correct zone, or simply passing over a barrel if already correctly placed. A basic system would be to work from right to left, or left to right, checking each barrel and moving each errant barrel when found. Moving barrels at this stage could be using a similar push/grab attachment as in approach 1, or a specialised sideways grabber to allow a robot to drive back and forth along the line of barrels. A slightly more advanced approach would be to scan all the barrels for position, possibly while relocating one, and then shuffle a barrel in error from the other zone back until all barrels are correctly placed. Barrels not in a zone must be identified and moved into a zone, as well as the correct zone.

   On a points basis, if a robot autonomously ploughed all barrels into one zone, it would score 540 points, so as a default position this strategy has some advantages. From then on, every barrel moved to it's correct zone effectively gains the robot 120 points, plus the bonus if all barrels correctly positioned.

3. Collect and Deliver

   This approach requires that the robot be capable of sorting and moving all or many, barrels at once.

   The robot drives around the arena collecting barrels, and once it's collecting capacity is full, drives to the zones to deposit the collected barrels. This could take one of several routes.

  1. The robot collects all, or several, of one colour and takes them to the appropriate zone.
  2. The robot collects all, or several, of any colour and takes them to the appropriate zones, sorting them as they are deposited.
  3. The robot collects and sorts all, or several, barrels of any colour and deposits them in the appropriate zones.

   This could obviously require an attachment not much more complicated than that used in approaches 1 and 2, or could involve something more complicated where up to 12 barrels are sorted and moved by a robot at once.

Attachment Ideas

    At it's most basic, a successful pushing attachment only has to sufficiently enclose and support a barrel at a low level to enable it to be positioned into a zone. This attachment could also include a colour identification sensor. 


Basic Pushing Attachment

    A pushing attachment has its limitations not being able to pull for which some sort of grabbing/gripping mechanism is needed. This can take the form of a passive grab (say a simple push doorway mechanism), and an active release, or an active grab and release, but given the low weight of the barrels, a passive grab may have limited use.

Upgrading the basic idea with a servo and a hinged flap...


   This now offers both push and pull from a simple grab, the servo can also be used to open the flap to give a bigger area to capture a barrel. 
Extended capture position, rounding off the edges a bit will probably help with capture.

   To handle the collection of multiple barrels and herding them to one place or another, as per approaches 2 and 3, something a little larger would be needed. No attempts here at loading a hopper or any other container, but that would definitely be a good option for anyone with design imagination and lots of time.  
   The flaps extend to accommodate and shepherd more barrels into the holder. they would fold flat at the beginning of the challenge to be extended. While they couldn't go wider than 325mm, they could extend to say 150mm forward so accommodating three rows of barrels.


With all barrels present


And this view begins to look like a server at Oktoberfest

These last two are simple horns to collect the barrels in two sections

The robot would have to plot its course to ensure it could easily collect and deposit mixed loads.
 
   We'll have to see what approach we'll take, we've built approach 2 before, but we may have a combined idea completely different. 
 
  Ideas we haven't developed further yet are 
  • cranes/arms, to both carry and position barrels, 
  • vacuums, especially to lift, 
  • barrel sorters, to mechanically sort barrels on the arena
  • barrel rollers to deliberately handle fallen barrels or even those that fall accidentally
  • blowers, to position barrels remotely
  • telescopic cameras, to give a better arena view
  • harvester, uses a rolling cage to sweep up and sort barrels into a rotating bowl to be deposited later

   One idea we did think odd, is that the green barrels turn red when contaminated by the contents, but not by touching the red barrels, maybe they shouldn't be allowed to touch the red barrels at all!!!

Still, onward, we have a chassis and some arms so time to play.


Thursday, March 17, 2022

Attachment action

After a bit of a delay actually doing things, now entering the phase of actually testing some solutions. 

First up is the Shepherds Pi herding solution. The chassis is working well and to get the basic herder fitted just required some bolts, power and a USB cable. This wasn't just a sudden event and the interface has undergone a bit of refinement.


What looks to be the final interface is to run attachment microcontrollers from USB via a hub, with a separate power supply to run motors and servos, putting the power conversion on the attachment to optimise for the particular attachment, standard power supplied being 12V.


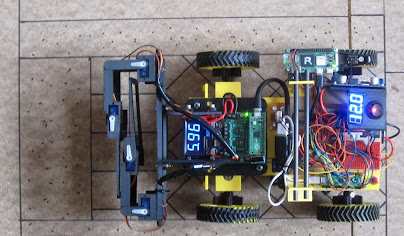
This is a picture of the shepherding attachment, controlled by a Pico on a Kitronik control board connected to the arm servos with a small buck converter power supply and power display. Also shown is a handle to aid picking the chassis up as it's now getting a significant amount of handling. The control board is a bit over specified here but in the next iteration will have to run two stepper motors.

The shepherding attachment has gone through several phases, and the one shown is good enough for basic positional testing using dead reckoning. Here's a video of a basic operation.


Some erratic movement on the arms due to controller initialisation signals, but this is a good test of a sheep 'fetch'.

While the arms do a good job with the sheep, they do need to do more and so the turbo-shepherd version is in construction and testing. Here's a video of it in test mode. 


Here a stepper motor is now giving lift to the arm to allow it to be move up and out of the way, open and close the gate, as well as potentially pick up recalcitrant sheep!

With the herding going well, the Hungry Cattle challenge is almost complete.

The montage above shows the feed dispenser attached to the chassis. The feed hoppers are attached to a turntable mounted between the wheels of the chassis. The robot feeder drives up alongside a trough, the turntable rotates a full hopper over the trough and dispenses feed. The robot then moves on to the next trough, meanwhile the hopper rotates the next hopper into position. Once feeding complete, the hopper turntable rotates back to a central position for refilling. The controller here is a Pico on a dedicated bit of stripboard to run three servos and a small stepper. 

Finally, a bit of dimension checking. The rules say it all has to fit withing the marked rectangles, so here we are, fitting in!
Picture with arms extended

and then with arms parked.
May need to tidy a few wires up!!!! 

That's it until next time, when we'll have some remote control via a PS3 controller, a dog whistle and maybe even some voice commands.....come by Shep!


Friday, February 25, 2022

Joining bits together!

Another team meeting this week to look at where we're going and show our progress. This is more a position update blog, not much to show in a structured way but an example of where we are.


First up is a video of the sheep herder. This is the basic version in operation, not the turbo, just giving us a view of how things will pan out in the arena. The arms and flippers aren't powered and dead reckoning is used for the small amount of navigation shown.


So we have a sheep dog but it needs a bit of training! This is also the first time a chassis and attachment have been mated together, it took only a few minutes and that's how the other attachments should fit!

Also demonstrated was our change to the use of a PS3 controller for remote control operations. We'll be using this for the Farmyard Tour challenge of course but it's main job in the coming weeks is to rehearse the best sequence of operations for the chassis and attachments for testing.

We're still moving on with the apple picking attachment, the laser cut practise tree shown in the last blog entry is now assembled, needs a bit of weight adding and the apple picking cup MK2 ready for testing.


Finally the cattle feeding turntable was demonstrated. This challenge is almost ready for full testing with most of the components finalised and control code written. This is possibly the simplest attachment but still comprises 36 individual 3D printed parts, together with many nuts, bolts, servo's and a stepper motor. Hidden in there is the custom controller board as well!


The picture has been shown before but next time will be a full demo video, we've already written the routine for the video!. Its controlled via micropython on a pico. 


That's it for this time, next time we'll have working sheep dog arms and a trough filling attachment!