Showing posts with label Brushless. Show all posts

Thursday, January 4, 2024

Zyderbot 9 - A Thoughtful Rebuild - PiWars 2024

Firstly, we have now moved from being a PiWars 2024 reserve team to being in the competition.  It may have seemed like we already were, but now it's official.  

These are a few pictures of the build/rebuild of our robot entry Zyderbot. We wanted two so that we could practice for the High Noon challenge and a rebuild also tidies up the ragged edges of quick modifications that accumulate along the way.

To start, a new design and layout for the front component base.

And with a components attached, from the top, 12V distribution, regulator and LiPo battery box.

Beneath this is the front chassis. The two brushless motors are shown mounted, and the central tunnel is the fitting for the rotation axis of the suspension. 

Next up is the fitting of the cab cover with the battery bay exposed.

And again with the bonnet/battery cover screwed on and a couple of wheels fitted.

The rebuild took a break over Christmas, but was soon underway again afterwards. Always good to see a tidy construction area!!!

While Zyderbot will complete most challenges autonomously, the remote control will be provided by a helicopter RC controller and associated IC's

Once breadboarded, the final circuit is constructed on a piece of stripboard. For the curious, this is a FrSky SBUS receiver / transmitter feeding an SN74AHC14N Schmitt trigger inverter at 5 Volts then a KeeYees level converter to get 3.3 Volts for the Pico

The rear layout of Zyderbot is a separate section with it's own layout.

And with the components fitted. It can look neat until the wiring starts!


Initial wiring, with USB being used to connect Pi and Pico.
Oh dear, it all does something but covering it up for sanity's sake is advisable. 

Completed, here it is, a new build. On/off switch relocated to the top of the cab for easy access, front headlights to evenly illuminate targets. Bonnet colour changed to avoid conflicts with a 360 degree camera looking for red squares.

The rear view, we like to know what voltage our batteries are at!!!!

Christmas rebuild task complete, on to challenge solutions!


Saturday, November 11, 2023

Chassis development - PiWars 2024

 So we needed a chassis and while we had previous skeleton chassis we could have gone back to, one of us has been developing a more substantial bit of kit.

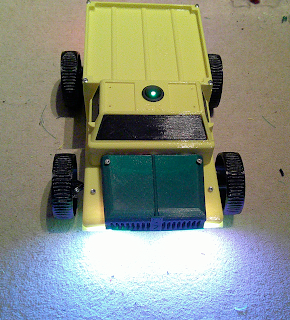
It started out as a four wheel drive 'tonka toy' with big rubber tyres that can handle uneven surfaces. As originally made, it looked a bit blank in lemon yellow, but a bit of paint for windows and a load to carry it looked a bit better. The chassis is in two halves, articulated in the middle, around a central battery holder for three 18650 LiPo's in series. 


The video shows a basic try-out though not very exciting. The remote control is via a helicopter RC and converted from SBUS via a Pico PIO program, code on github here EastDevonPirates2024. The voltage display on the rear, as well as an obvious on/off switch, are very useful.


But never quite happy, it wasn't really up to our PiWars 2024 standard,  so it's been remodelled. The wheels are much smaller to accommodate PiWars chassis size rules, they may change yet again but these are the working wheels for now.


Gone are the flashy headlights and a new detachable bonnet fitted to cover the remodelled battery box. 


We haven't remodelled the wiring yet, but we do have a flashy invisibility cloak (lid) so you can't see them!!! As well as being a lid, that will also be a platform for attachments, more on those in later blogs.


All that's in there right now is a Pico and an RC receiver. Independent FIT0441 brushless motors on each wheel with built in motor controllers and pulse counting for rotation sensing provide the driving force.

Fans of this look can get the stl files from github.


Saturday, February 12, 2022

Start of an arena

 While a lot is happening, somehow there's never much to see for all the effort, but at our last PiWars get together we had the start of our arena to view.


It's made out of flooring board so can be dismantled into three parts and we've marked it out in 250mm squares to start getting the feel for what the space looks like.  No apple tree on view, but some test cardboard sheep and wolves, together with our newly made cattle troughs, fill up the space. 

It was also an opportunity to look at motor speeds and load capacity. This robot is our test bed for a set of four brushless motors. We've loaded it up at the front with a 1kg weight to simulate a full load of cattle feed (rice) to see what its performance is.


So speed tests put the crossing of the arena from standing start to stop at 2 seconds with the full load, which we're happy with. None of the attachments are very heavy so we're ok to go. Might need a bit more grip on the wheels to get better acceleration and ensure a skid free stop, but the work we described in the last blog has paid off, so success. A small accident in control during one of the tests demonstrated it also turns very quickly as well!

Also on demonstration on the arena are the navigation beacons.


These will be used by the vision cameras on the robot chassis to give an accurate position within the arena and provide the navigation references. This picture shows three coded beacons but the arena will be surrounded by them eventually.

As well as the tea and biscuits, a quick view of the kitchen table gives an overview of what's been going on.


In the foreground on the far left is the time synchronisation test rig to provide an accurate common time reference to the independent stereo cameras.

Beside it in yellow and black, is the modified cattle feed hopper, extended at the top to hold more feed, and fitted with a large drum to deliver feed to the trough faster. Also shown are two other hoppers in green with out the capacity extension. The need for the extension followed tests with the accurate 3D printed troughs showed that we hadn't been delivering enough feed to the trough to cover the centre line so we needed to increase the amount. We could have designed some sort of shaking device to even out the feed in the trough but just increasing the amount was faster and unsophisticated.

Between the two green hoppers is the new turntable to rotate hoppers over the side of the robot chassis for dispensing, and then returning them to an inboard position to keep the weight distribution within the robot wheels.

At the rear is a yellow test robot chassis powered by an ESP32 which is used to test attachments and in front of that a pair of arms for gathering and gripping sheep. We found that the cardboard sheep we'd made were actually to big and so the arms couldn't quite reach round them! It also used fairly low cost servos which didn't perform well, so will need a bit of an upgrade before the next demonstration, as well as the lift mechanisms fitting with the new stepper motors.

Next meet will be a test of the Hungry Cattle challenge with remote control, progress! 

Finally just another picture of the arena with bits in place. We had made three wolves and six sheep but two sheep were lost, but we put them in place anyway.


Also on show are the beacons, troughs, stereo cameras, and four test bed chassis!!!!!

Tuesday, February 1, 2022

A New Chassis, new motors and fancy troughs

 So we've been designing a new chassis, based partly on the original, but with a few new ideas added. 


The coffee and biscuits are a key part of the design process though may not be part of the final implementation. These are HLC208 encapsulated brushless motors with the controller electronics built-in. They also have their own direction selection feed as well as an accurate speed output. 

The supplier website gave instructions for testing these out and some sample code, but that did little other than turn the motor. Adding an extra earth and scrapping their example code in favour of hastily written test code got them working nicely, variable speed, direction changes and feedback with very little cpu time involved. Very simple to use when you know how!!!! We'll see how they progress.

Now that we have some stl files for the Hungry Cattle troughs from the organisers, we thought investing some print time in creating three accurate troughs with halfway lines printed in. And here they are, they look ok, though we did get one line not quite right!! So just have to fill to above the line!


Next up will be the new hopper emptying mechanism, should be a bit faster than last time.