Showing posts with label Zombie Apocalypse. Show all posts

Wednesday, April 10, 2024

Last before Cambridge

So this is possibly our last blog entry before we're off to Cambridge with Zyderbot, ready or not. I'm sure we'll take part in everything anyway but this is where we're at right now. 

So we had to make a video, I suppose we could have done it weeks ago but even though it's one of the challenges, somehow it doesn't feel like it. This blog has been going since last September, but even so, it still feels more real. 

Two of us got together in the kitchen with an old camera (well, old for modern times, it was still digital!!!)  and with a basic script took turns to operate the camera and do some impromptu words about Zyderbot. We aren't natural publicists so we're a bit awkward, but it's done.


The video became an explanation of some of the key points, with added picture within picture to provide voice over explanations of key points, this picture showing the emergency fuse to prevent magic smoke emissions.

While it's a competition and we want to compete in all the challenges, we have to enjoy doing it, and the real competition is solving the puzzles we're given. The rest of the pictures here are all from the video of some things we've learnt.

Nerf guns and Stepper motors

Being geeks we had nerf guns, but adapting the mechanism for use in PiWars turned out to have a range of issues. But here it is in all its chaos. Eventually all that is used from the gun is the flywheel acceleration module, and the dart magazine.
We had some fun with the aim of the gun, and have fitted a recycled barrel to increase accuracy. The barrel was originally a croquet mallet handle, which then became a battery holder in a previous Zyderbot iteration, and now a nerf gun barrel. You can just see a cat toy laser clipped on underneath.

The flywheel module of the original gun was easily unscrewed and was easy to remount.

The trigger mechanism wasn't so easily recreated and we ended up using a stepper motor to push the darts into the flywheels. 
Lesson learnt, do not power stepper motors continuously when not in use. So it was left powered on, heated up and shortly the plastic mount for it melted. Replaced with a metal mount and a change to code in a float state when not actually in use.

Magnets

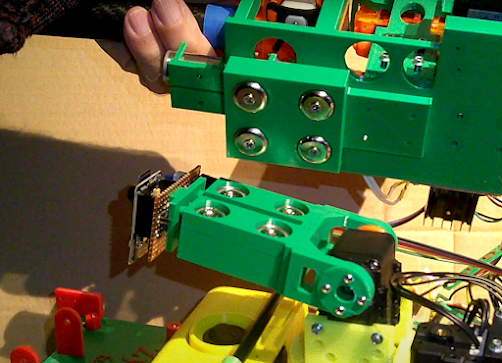
We use a lot of magnets for quick assembly and disassembly of Zyderbot between challenges. Here is the main arm which is reused between the Eco-Disaster and Zombie Apocalypse challenges. The base is attached to the robot rear using a pair of magnets at each corner which gives a very secure base.

 
Four magnets on the arm allow for holding the zombie gun and barrel handling attachments

Four on the attachment line up 

And fully assembled with four matching magnets it's a secure joint.

The nerf gun similarly has four matching magnets

And so has a very secure platform.

Lesson learnt. You don't need four matching magnets for everything. The magnets are strong enough to hold using just a metal washer on one side and magnet on the other. We fitted four pairs to the battery box and now need a crowbar to get it open. They're also not always cheap so it costs twice as much!

Barrel Handler

One of the things we want to avoid in Eco-Disaster is to have barrels rolling around the arena. Partly because they'll be difficult to get into the end zones, and also because they'll potentially get caught under Zyderbot and need a rescue. 


Consequently, last minute mods to the barrel handler to add a plough to push barrels away that accidentally get in the way. This means not lifting the barrels very high, but then also not having to worry about dropping them on another barrel, though stacking them would be an interesting challenge (a la toys). We've also fitted a rear bumper to do the same thing.

Configuration
Zyderbot has a set of 8 dip switches on the rear which allow easy configuration between challenges.

Also shown in the picture is the battery monitor display, the rear light and the stop/start button. The rear light also doubles as an information display. For the Pi-Noon challenge we'll be covering this with a magnetically attached plate to protect the settings!!!!

Ultrasonic sensor
Lots of us will recognise a HC-SR04 ultrasonic sensor, so we couldn't miss one off, it's very easy to use and adds a bit more of a feature than a 5mm square laser sensor on pcb, though we're using one of those as well!!! Might come in for barrel detection as well.


Lighting
We have very little idea of what the lighting will be like on the actual day and most of our testing has been done in very variable conditions, so having a pair of headlights on the robot helps a lot in colour and line detection.


It's also part of the robots image, we can't have a lightbar because of the attachments but these will work well.

Might actually do a blog of the weekend but we'll see how excited we are :) 

Well that's this bit done, just the competition itself, then back to building and demonstrating other robots, but I'm sure we'll find a place for Zyderbot!


Monday, April 1, 2024

Tuning!

 Tuning!

So we build solutions, they should work, and then the real world gets in the way. 

Lava Palaver progress

We'd gone for a camera sensor for the Lava Palaver challenge, not because it was a better option for following a line, but because it was automatically immune to the hump in the course. However, this threw up new issues. The competition course is 7m long and painted black, the only surface available for testing is a light wooden floor which makes for very poor contrast.

 Early testing was plagued with phantom readings from reflections which confused the robot, so testing moved to using a black line instead, with the intention of switching over to white for the competition day. This was much more successful, but space is a limit again. To make a test worthwhile, we're going to have to go for a bigger course outside, using a long roll of black art paper with white electrical tape down the middle and hope for dull days!

Illumination was oddly a very important feature. Off the shelf line follower attachments tend to be IR sensor based and have built in illumination which tends not to be noticed, but for the camera, even illumination is essential to get good contrast for the line, so the robots headlights have to be used to light up the track ahead, together with an overhead light illuminating from above. 


The result is a fairly simple bit of code at the end, but beneath it is a lot background code doing the heavy lifting and interfacing. 

One of the items outdoor testing might help with is coping with bright sunlight and shadow. Watching the competition from previous years, it's obvious that this can have a detrimental impact on robots using optical sensors so we'll be looking at that. It's hasn't been done yet but we'll be experimenting with a sunshade for the robot to give more even lighting for the camera and hopefully reduce errors.


Zombie Shooting
For the Zombie Apocalypse, we've had an idea to use a butchered standard nerf gun which looked very promising out in bits on a table, see an earlier blog post, but we discovered a weakness. Using the servo method of pushing the nerf pellet into the gun worked a lot of the time, but then would jam the gun requiring it to be dismantled to clear the jam, it wasn't suitable for the competition. This held us up for quite a while but an obtuse solution using a stepper motor and a rotating cam came to the rescue, so now we're back in business.


The video shows the cam operating and firing off a magazine of pellets. We then got a cat laser toy and pressed it into service to help with aiming, now how many competitors will be aiming at butterflies?


As the video shows, the gun fires to the left, a bit more work to do but on our way.:) 

Minesweeper
Again, this is one we had a solution to some time ago, but when we come to use it, there's a surprise for us. We're using an overhead camera, but processing the image in memory leaves off a lot of the arena, a 'feature' of the camera.


 The image was always going to be distorted but missing bits is a problem we haven't time to overcome, we'll just have to code round it. This means that the robot will have to search for the red square sometimes instead of just being able to see it and move to it. 

The algorithm for this will be basic, something like the following.


Just how accurate the movement will be isn't known, we were expecting to just move to the red square wherever it was, but this now requires some idea of where the centre of the arena is. Only testing will tell. We're doing this challenge on mecanum wheels. As the arena is 4 x 4 matrix, all red squares will be within it and so a map can be built of the arena based on squares that have already been red. Will this be good enough for the minimum 20 moves required we'll have to see. Anyway, signing off with an errant robot which finds it's square, and then ignores it, ho hum.


Friday, March 22, 2024

Days tick by......

 With less than a month to go it seems we have lots of solutions which are all but ready to go. Line followers that can see lines but can they drive seven metres in a straight line? Square finders that can see the squares, but can they drive to one and then the next? All will be revealed on the 21st April in Cambridge but for now here's some progress.

The Lava Palaver line detector works well but instead of a fixed mount, needed a bit of adjustment so has now been given an articulated mount.


This has been 3D printed to be integral with the magnet attached battery box cover. More magnets have been deployed to the rear part of the robot for quick change attachments for shooting zombies and collecting barrels.


It's great to see the layout before dozens of wires obscure the view!!!! More uses for magnets has been found in adjusting the barrel handler. 


This also makes it quicker and easier to change the types of attachment to see which works best. 


This is our barrel handler in serious searchlight mode. It obviously works but needs a bit more software behind it to get barrels to their destination. 

More on this to come. 

The Escape Route challenge still needs a bit of work, but we're working from an old formula so it's more tidying up than new development. To get cleaner lines on the robot we've hidden a VL53 laser range finder inside one of the cab windows, along with IR sensors on the sides and an ultrasonic sensor on the front of the robot.


When not in use we'll be closing the window with bluetack!!!!

First experiments with the sensors aren't perfect, as the following video shows.


But after a bit of tuning and building a test course, it's starting to look the part.


This is our goth themed video selection but we just need to get this running a bit more smoothly.

 We've had a solution for Minesweeper for sometime, but we've only just now got round to fitting it to the robot. 

It's an overhead gantry mounted camera which reports an XY co-ordinate of the red illuminated square on demand from the robot. The robot will be running on mecanum wheels for this challenge and the gantry is adjustable to keep the robot within the height limit of 450mm. Navigation is all relative to the red square, so, see a red square and drive to it!! To reduce the impact of the gantry on the image, 4mm black carbon fibre rods have been used for support. Also in the picture is the carry handle for the robot, to make handling easier and safer. A better view here.


With a variety of configurations needed for the competition day, a new control panel is being created for the rear of the robot which will allow the robots Pi to be quickly switched between challenge modes, as well as a battery monitor and a start/stop button. To make sure we've got everything covered for each challenge configuration, we've started a checklist, I'm sure it'll get longer soon!!! Here's where it is now.

Challenge: Lava Palaver
  • Wheels: 105mm
  • Bonnet: Line Detector
  • Back cover: Plain
  • Attachment name: LINES
Challenge: Zombie Apocalypse
  • Wheels: 70mm
  • Bonnet: Plain
  • Back cover: Nerf Gun
  • Attachment name: ZOMBI
Challenge: Eco-Disaster
  • Wheels: 70mm
  • Bonnet: ???Not yet determined???
  • Back cover: Barrel Picker
  • Attachment name: ECODI
Challenge: Minesweeper
  • Wheels: Mecanum
  • Bonnet: Plain
  • Back cover: Camera Gantry
  • Attachment name: MINES
Challenge: Escape Route
  • Wheels: 70mm
  • Bonnet: Ultrasonic detector
  • Back cover: Plain
  • Attachment name: None
Challenge: Pi Noon
  • Wheels: Mecanum
  • Bonnet: Balloon attachment
  • Back cover: Plain
  • Attachment name: RC
Challenge: Temple of Doom
  • Wheels: 105mm
  • Bonnet: Plain
  • Back cover: Plain
  • Attachment name: RC
Next time we hope to have more demonstration videos of being fully ready for all challenges.....but then again maybe not!!!!


Wednesday, February 7, 2024

New Year Progress - Pins and Needles!

Now well into the new year, we got together again to review progress and where we were. 

We now had two Zyderbots to practice with and a visitor from another team, Phil from PiDrogen, came to play too.

Of course most of the meet was about Zyderbot and exchanging what we'd done so far. 

Getting the right version and configuration of OpenCV working on the Raspberry Pi platforms had been a significant task, if only for the compilation time involved. Difficult to show that in a blog, so here's some pictures of laptops with running code. 


This is our idea of a zombie for training the recognition engine. We'll have to revisit this on the day when we get to calibrate against the actual competition zombies.

We didn't get an updated demonstration of the Zombie gun though, the experimental use of solenoids for the trigger mechanism now reverting to more powerful servos for reliable operation. 

The line follower for the Lava Palaver has now reduced to a single camera sensor which detects the white line position, the course 'bump' and the end of course, sending out positional data to the controller on request.. 


The picture shows a streamed version of the detector output which actually slows it down quite a bit but gives confidence that it's doing what it's meant to, here showing three detection zones. Turning the image update and streaming off improves the response time dramatically and isn't necessary for the actual challenge but gives confidence that all is working as it should.

The sensor for the Minesweeper challenge is the same design as the line detector but with a different mounting and software setting. It wasn't setup for demonstration at the meeting, but works on the same principal, reporting the observed relative position of the red square to the controller. The following picture is a test view of what it 'sees'.

This is an uncalibrated image of a red A4 sheet on a noisy floor, we don't have an illuminated 'disco' floor to test it on! It's also surprisingly undistorted for a 160 degree lens, I'm sure the final version will 'fix' that! Code for this sensor will be on Github here.


A lot of the afternoon was occupied with High Noon and we were intending to have some practice with the PiDrogen robot Firefly, but we didn't have a compatible controller so it became a Zyderbot vs Zyderbot challenge. 

Wire coat hangers are becoming more scarce, but we found a couple of ex dry-cleaning hangers and  cut them to size. 

Using bolt cutters might be overkill but works!


We now had the 'official' wire mount and both robots were duly equipped. 


The video is of Phil from PiDrogen vs Colin from EastDevonPirates trying out their skill. We really didn't have enough balloons but we had fun, quite a bit of skill to acquire yet though. It was also a try out of mecanum vs tank steering as the two robots dance inexpertly around each other.


What we now need is more practice and a lot of balloons!


Finally, we took a team picture, might have to do another one, bit of an odd distortion!


Next up will be smaller team meeting to ensure we have solutions for each challenge and possibly some technical info!


Saturday, December 9, 2023

Update Meeting - PiWars 2024

 We finally all got together in the same room to see what we'd been up to. The big attraction of the afternoon was the Zombie Apocalypse challenge and where we'd gone with it so far.

This is very much in two parts, the gun platform and the gun.


Here we see the a mock-up of the gun, using parts removed from a working Nerf gun, and 3D printed parts to adapt them to test usage.


For the demonstration, the flywheel motor was driven by a switched AA battery pack (actually a 6 x AA pack adapted for 4 x AA) and the 'firing mechanism' is an SG90 servo connected to a servo tester.


As this mock-up shows, it works well. To get a feel for what the targets might look like, we have to practice, a few small pictures mocked up onto a cupboard helps. This is a view from the turret camera.


They look a bit small don't they! This was with a Pi Zero fitted camera, but a little upgrade helped.

This helped a lot!!!


The chassis has undergone a few changes as well, and now has a Pi3 inside, as well as the original wiring. The following picture shows what we've fitted inside.


This has meant that for operational testing the chassis has been modified further to get access to the boards inside, both to change the SD cards and to plug in USB cables. 


We also have headlights as well which will be very useful for the Lava Palaver challenge when consistent lighting will be important. Here's a video of the chassis in action.

This also demonstrates the control from a standard RC handset via SBus which is working well.

We have been active on building the Line Follower but that demonstration we'll leave until the next meeting.


Monday, November 13, 2023

Nerf Gun Platform - PiWars 2024

      In a team, items come along all the time and if you're writing the blog then either you leave a mountain of things to add, or just publish them there and then. 

     Some things just get decided as the obvious way to go so building a platform for aiming and firing a Nerf gun just seemed the sensible thing to do for the Zombie Apocalypse challenge, though there'll be a blog analysis of it along soon.

Mounted on the rear lid of the chassis, the arm is rather overkill to support a Nerf gun, but it has it's origins in one cooked earlier for a drawing robot arm, so easier than developing a whole new arm. The servos are AX12 serial servos controlled via the official Dynamixel USB controller by a Pi Zero, which can be just seen mounted under the arm, with camera for aiming. The gun connector is a Picatinny rail, Nerf fans will appreciate that.

The heart of the arm is this bearing. It weighs 220gms just on its own without the rest of the arm, but gives superb glitch-free smooth rotation with any weight, even unbalanced.

The whole truck now weighs 2Kg, but it still drives OK

The Nerf gun we are intending to use is a Nerf Stryfe which may not be available in shops any longer, but we have one because we like playing with things. NOTE: this is different to many of the newer versions of the electric Nerf guns in that it is screwed together and so can be disassembled easily, some of  the newer ones are glued together so much more easily damaged when being taken apart, possibly a job for a Dremel if using one.

The following pictures are of the gun mechanism.

Electric motors spin up flywheels just before the barrel of the gun and after the Nerf dart magazine. 

Once the flywheels are up to speed, the trigger is pulled and a mechanism pushes a dart forwards from the magazine, see the arrow in the picture above, until it is caught by the spinning flywheels which catch hold of it and accelerate the dart out of the gun barrel. The flywheel motors are designed to be run by four 1.5V alkaline batteries (about 15Wh) and are normally expected to not last long, but powering them from the vehicle batteries (31Wh) is expected to be ok for the challenge. 
A test cradle has been designed to hold the active portion of the Nerf gun and dart magazine to facilitate fitting to the aiming mechanism.

Out of the box, these foam dart guns have a surprising range and accurate over short distances so are worth the effort to modify. In the unmodified versions, the flywheels are only powered when a trigger switch is pulled, connecting the batteries, so are unlikely to be operated for long periods of time, this is an area which needs to be understood in order to ensure the reliability of the mechanism and prevent overheating. Of course, if the mechanism is going to be modded, increasing the voltage, and thus the speed of the flywheels, might increase the accuracy, something to experiment with. The mechanism also has a variety of interlocks to prevent operation when the gun is not complete, all of which will need to be removed or bypassed.

So, on with the fun, though it might be a bit longer before the next blog post!!!!