Showing posts with label OpenCV. Show all posts

Saturday, December 23, 2023

Show and tell December meeting - PiWars 2024

 And the next update meeting. It might seem to be quick on the heels of the previous meeting but that was just the delay of the blog writer getting on with it.

Not a full meeting this time due to illness, it's been going round the team, so we didn't see any progress in the nerf gun mount but we did look at what the zombie ideas might look like and a trial camera mount of for the minesweeper challenge.

Firstly a small update on the lava palaver challenge.


Apart from just a reprint of the front attachment, the ball bearing skids have been replaced by two jockey wheels to cope better with small steps in the course and for the 'bump'. The microswitch is still in place for the physical bump detection but will be replaced by an optical switch when the hinge is remade.


For this iteration, the line guidance is still using IR detectors in two rows, to improve resolution using off the shelf parts but it's likely that a camera interface will be used finally.

The image recognition for the Zombie Apocalypse and Eco-Disaster challenges moves on with good recognition and aiming now achievable. 


These are recognition tests as well as calibration screens, we're guessing at what zombies look like. 

Finally we have built a basic overhead camera detector for the Minesweeper challenge to check the calculations on being able to 'see' the whole arena.

Here the 160 degree camera is mounted at 350mm above the surface, which gives a 600mm radius surrounding view. Raising the gantry to 450mm extends this to a 800mm radius.


This is a bit ungainly but does demonstrate the approach to view the whole 1600mm square arena in one image for processing. For the next meet we'll be aiming to get that extended as well as some line following and mine hunting code.


Thursday, October 26, 2023

Eco-Disaster PiWars 2024


 Something  to think about anyway, sorting 12 barrels by colour into two areas, autonomously, within 5 minutes. That's the PiWars 2024 Eco-Disaster Challenge detailed here Eco-Disaster – Pi Wars
Well we have to think about it, though we may never get to do it!!!

The Challenge

   The arena for this challenge is 2.2m square, with a central area of 1.6m square where the barrels are located, positions of which revealed on the day. 

    So, the challenge is to relocate the barrels, red for toxic, green for ok, to two areas, denoted as blue and yellow, scoring 80 points for the number of barrels relocated correctly, but loosing 40 points for incorrectly relocating barrels. There are extra points for part way completion, 50 for six barrels correctly sorted, and 150 for 12 barrels correctly sorted. Additionally, 250 points for completing the challenge autonomously, which as an 'advanced' team, we have to. As with other challenges where time matters, if all barrels are collected, additional points are awarded according to the formula system described here Formula Scoring System – Pi Wars. Thus, for completing the challenge correctly, and fastest, within 5 minutes this challenge scores 1510 points.


Approaches

   Here are three general approaches to the challenge, and the final one used may be one selected on the day depending on the layout of the barrels, or just a  mixture, but without a strategy then attachments can't be designed.

   As an alternative view, it's been pointed out that as an autonomous challenge earns 250 points, simply letting the robot stand still or spin on the spot might earn the points, as incorrect barrel placement, however accidental, will loose points.

   Assuming we're actually going to attempt the challenges, the first hurdle is identifying the colour of the barrels to be placed. An immediate option is a colour camera which has associated code to identify the colour correctly. If this is used then it's likely that this camera will also be used for navigation to the clean and contaminated zones, and preferably avoiding knocking over any of the other barrels.


      A less code intensive option is to use a colour sensor such as a TCS230, which can be tuned to identify the correct zone and barrel colours on the day. This would have to be used in association with a separate navigation system, such as an ultrasonic, laser or IR system. 


1. Individual Barrel Placement

    This requires that the robot locate each barrel, identify the colour, and then navigate across the arena to the correct location and place the barrel there. 

    At it's most basic, the robot could be fitted with a 'pusher', drive up to the barrel, push it around the arena and into its correct zone, then repeat 11 times. This does imply that the route to the zone is navigable and also that the barrel is in a position to be pushed, and hasn't been stuck up against a wall.

    The next step to this would be to have a barrel handler which will grip the barrel in some way allowing the barrel to be positioned where required. Attachment design ideas are in a later section.

   The arena design has allowed for free movement around the outside initially and a simpler strategy might be to drive the robot to one of the corners adjacent to the target zones and collect the barrels from that position where the other barrels would be unlikely to get in the way of a robot repositioning one.


2. Sweep Then Sort

   In this strategy, the robot makes two passes at barrel placement. 

   In the first pass, the robot uses a pusher, possibly of maximum width 325mm, to push all the barrels collectively  to the side of the arena containing the zones. This will immediately place some barrels in the correct zone and of course some in the incorrect zone, as well as a few outside a zone. This may appear to be a quick solution but it would probably take five passes over the arena to guarantee collecting all in this way which might reasonably take 1 minute. 

   In the second pass, the robot then begins to sort the barrels, now against  one arena wall, either moving an incorrectly placed barrel to the correct zone, or simply passing over a barrel if already correctly placed. A basic system would be to work from right to left, or left to right, checking each barrel and moving each errant barrel when found. Moving barrels at this stage could be using a similar push/grab attachment as in approach 1, or a specialised sideways grabber to allow a robot to drive back and forth along the line of barrels. A slightly more advanced approach would be to scan all the barrels for position, possibly while relocating one, and then shuffle a barrel in error from the other zone back until all barrels are correctly placed. Barrels not in a zone must be identified and moved into a zone, as well as the correct zone.

   On a points basis, if a robot autonomously ploughed all barrels into one zone, it would score 540 points, so as a default position this strategy has some advantages. From then on, every barrel moved to it's correct zone effectively gains the robot 120 points, plus the bonus if all barrels correctly positioned.

3. Collect and Deliver

   This approach requires that the robot be capable of sorting and moving all or many, barrels at once.

   The robot drives around the arena collecting barrels, and once it's collecting capacity is full, drives to the zones to deposit the collected barrels. This could take one of several routes.

  1. The robot collects all, or several, of one colour and takes them to the appropriate zone.
  2. The robot collects all, or several, of any colour and takes them to the appropriate zones, sorting them as they are deposited.
  3. The robot collects and sorts all, or several, barrels of any colour and deposits them in the appropriate zones.

   This could obviously require an attachment not much more complicated than that used in approaches 1 and 2, or could involve something more complicated where up to 12 barrels are sorted and moved by a robot at once.

Attachment Ideas

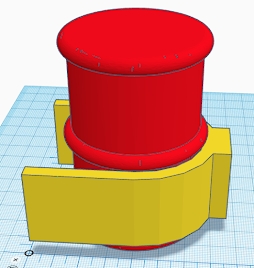
    At it's most basic, a successful pushing attachment only has to sufficiently enclose and support a barrel at a low level to enable it to be positioned into a zone. This attachment could also include a colour identification sensor. 


Basic Pushing Attachment

    A pushing attachment has its limitations not being able to pull for which some sort of grabbing/gripping mechanism is needed. This can take the form of a passive grab (say a simple push doorway mechanism), and an active release, or an active grab and release, but given the low weight of the barrels, a passive grab may have limited use.

Upgrading the basic idea with a servo and a hinged flap...


   This now offers both push and pull from a simple grab, the servo can also be used to open the flap to give a bigger area to capture a barrel. 
Extended capture position, rounding off the edges a bit will probably help with capture.

   To handle the collection of multiple barrels and herding them to one place or another, as per approaches 2 and 3, something a little larger would be needed. No attempts here at loading a hopper or any other container, but that would definitely be a good option for anyone with design imagination and lots of time.  
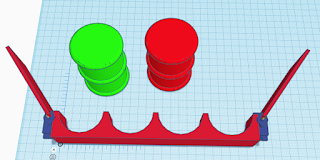
   The flaps extend to accommodate and shepherd more barrels into the holder. they would fold flat at the beginning of the challenge to be extended. While they couldn't go wider than 325mm, they could extend to say 150mm forward so accommodating three rows of barrels.


With all barrels present


And this view begins to look like a server at Oktoberfest

These last two are simple horns to collect the barrels in two sections

The robot would have to plot its course to ensure it could easily collect and deposit mixed loads.
 
   We'll have to see what approach we'll take, we've built approach 2 before, but we may have a combined idea completely different. 
 
  Ideas we haven't developed further yet are 
  • cranes/arms, to both carry and position barrels, 
  • vacuums, especially to lift, 
  • barrel sorters, to mechanically sort barrels on the arena
  • barrel rollers to deliberately handle fallen barrels or even those that fall accidentally
  • blowers, to position barrels remotely
  • telescopic cameras, to give a better arena view
  • harvester, uses a rolling cage to sweep up and sort barrels into a rotating bowl to be deposited later

   One idea we did think odd, is that the green barrels turn red when contaminated by the contents, but not by touching the red barrels, maybe they shouldn't be allowed to touch the red barrels at all!!!

Still, onward, we have a chassis and some arms so time to play.


Monday, October 23, 2023

Lava Palaver - PiWars 2024

Introduction 

We aren't actually in PiWars 2024, but just a reserve team for the advanced category, which doesn't mean we don't have to do anything! Assessing the challenges and thinking about what's involved has to be done. 

We've all been involved with a robot workshop so haven't had much time to look at these things in depth but here's a view on the first of the challenges listed, Lava Palaver. The official description of the challenge is here Lava Palava – Pi Wars

The Challenge

This is a black painted course 7 metres long and 55cm wide, with walls 7cm high and part way along is a double chicane where the robot has to turn right then left, followed by a left and then right. A white line 19mm wide is positioned along the centre of the course. Without attachments, the maximum width of a robot is 225mm, or half the width of the course.


A course like this has been used in previous years, but as a change to the layout, a 'speed bump' will be inserted onto the course on the day of the competition, dimensions shown below.

This one feature does introduce a range of considerations also applicable to the obstacle course challenge covered later. The overhang on a robot, that part of the chassis ahead of the front wheels or tracks, will need to be able to clear the leading edge of the 'bump' and also once traversed, be able to avoid colliding with the level part of the course when coming off the 'bump'. A robot could, of course, be made sufficiently robust to collide with this and continue on, either with strengthened chassis, the addition of a skid or with a leading idler roller or wheel. The table below lists a range of overhang lengths and clearances required.


The course is to be navigated autonomously and 225 points are awarded to each of three runs completed within 5 minutes and additional 100 points for each of these three runs where the robot doesn't collide with the sides of the course. The combined run times of three runs are compared to the other robots and up to 150 points can be awarded on a decreasing basis for the fastest robot times according to the PiWars formula, described here Formula Scoring System – Pi Wars. Finally, for the fastest individual run of a robot, 275 points are awarded. The maximum points awardable are therefore 1400. From a strategic viewpoint, completing the course three times without touching the sides and within the time limit gains 975 points, 70% of the maximum, so from an effort perspective is a worthwhile target in itself. Once a successful run navigation strategy is achieved then the speed could be increased to competitively gain the extra points.

Navigation strategies

There are several strategies which come to mind, and may be adopted either individually or combined. These are dead-reckoning, wall following, line following and for the second and third runs, memorised tracks. Collision avoidance, while not a navigation strategy, is desirable so will be included!

Dead-reckoning

As the shape of the course is known, separate routines could be incorporated into the robot navigation code to drive the robot  in different ways depending on the assumed position of the robot. Therefore, the routines could be for example.

Drive-forward-2.5-metres
Turn-right-45-degrees
Drive-forward-700mm
Turn-left-45-degrees
Drive-forward-1-metre
Turn-left-45 degrees
Drive forward-700mm
Turn-right-45-degrees
Drive forward-3-metres

These descriptive routines could be taken to successfully navigate the centre of a course, without reference to the 'speed bump'. This is not the shortest route of course and starting the robot already close to the right-side wall and navigating close to the left hand wall through the chicane, returning to near the right side wall on the lead out would be shorter and thus faster for a robot with similar speed capabilities. Robots with a chassis width less than the maximum would be able to take best advantage of this strategy.

Dead-reckoning has been done successfully with timed robot runtimes, but works more reliably when the wheel dimensions are combined with measured rotations of the wheel to calculate the distance accurately. Similarly, robot direction can be estimated by relative wheel rotations (combined with wheel orientation depending on steering method). A robot using mecanum wheels could simply move at a required angle without changing orientation. Gyroscope/accelerometer circuits can be incorporated to provide even more orientation information.

On a simple course such as Lava Palaver, dead-reckoning can provide an effective method of autonomous completion. The assumed measurements in the example could be confirmed on the day of competition, and corrected by physical measurement of the course. This could also include the position of the 'speed bump'  to accommodate any speed/power variations which might be needed. Including collision avoidance to improve the usefulness of the estimations input will aid the navigation.

Wall following

The course has a wall on either side, and while colliding with either wall might reduce the score, and time, available, it does offer a consistent guidance reference throughout. Detecting walls can be done with a variety of non-contact technologies, such as ultra sonics, laser and infrared (IR) distance measurements. 

Ultrasonics

Detectors are mounted on the sides and front of the robot and provide a reading how long an ultrasonic pulse of sound takes to reflect from a surface. These can be either self contained, carrying out the measurement and providing measurement information, or controlled by the robots controller and the timing and subsequent distance measurement calculated directly. These detectors can be prone to errors  due to the angle of the surface they are facing and the level of reflectivity, hard surfaces working best. 
This is a very common low cost ultrasonic sensor, in this case, run from a controller.


Laser

In recent years, small laser equipped distance sensors have become available, such as the VL6180X or VS53L0X models, which can provide an accurate and fast measurement providing that the target surface is reflective enough. The surface of the course walls are painted black and this may significantly reduce the effectiveness of this type of sensor, but trying it may be a useful lesson. They also cost a bit more than the ultrasonic sensors, which may need to be taken into consideration when adding multiple sensors to a robot.
   LIDAR (LIght Detection And Ranging) sensors are not beyond the budget of many robots (both in cost and size) and can provide a detailed map of a robots surroundings, but do need to be able to 'see' the course walls which may prove difficult to engineer a robot to do in this case.
This picture of a low cost LIDAR sensor is driven by an electric motor to give an all round view. It costs in the region of a good serial servo which many roboteers use.


InfraRed(IR)

These sensors rely on the level of reflected IR light from a surface, which is illuminated by an associated IR source. These can be very effective measuring small distances where the ultrasonic detector would fail completely but may suffer the same problems as the laser sensors when observing the black sides of the course.
This is a pair of IR sensors with adjustment for triggering sensitivity.

The following is an example sensor layout.

The rectangles describe the locations of the sensors for both wall following and collision avoidance and could be either ultrasonic, IR, or both. One option for the front collision detector is to mount it on a servo to provide a sweep of the area in front of the robot for greater coverage. 


Line Following

The white line down the middle of the course provides an immediate point of focus for guidance being consistent throughout. Line following is a very common entrance subject to robotics and using error correction to establish a reliable guidance mechanism. Information about the position of the line relative to the robot and its directions is typically obtained via an array of point sensors or from a high resolution optical camera. There are also low resolution optical cameras available which provide a much simpler interface and image to analyse for guidance.

Point Sensor Arrays

These come in various types but are typically a light sensor and light source as adjacent pairs and provide a signal based on the reflectivity of the surface which can be used to detect a white or black line on a background black or white field. 
Individual sensor, this is a TCRT5000

Here, eight sensors have been soldered to a sensor bar and an I2C interface provides access.


Some colour sensors can detect coloured lines to enable multiple lines to be used for different guidance uses in the same plane. A basic array would be two such pairs a short distance apart and mounted across the robots chassis at right-angle to the direction of travel. These give basic information such that when the right sensor is over the line, turn right, when the left sensor is over the line, turn left. Adding more sensor pairs enables the robot to more accurately determine the position of a line and placing them closer together enables a greater degree of granularity of control. Using two or more lines of sensors enables more directional information to be gathered, and varying the shape of the sensor array ( an arc can be beneficial) , together with varying the spacing of sensors to give both coarse and fine positional sensing can be helpful.
Positioning the sensor array ahead of the robot gives more time to make corrections, as well as placing arrays further back on the robot chassis to reduce over correction situations. They can also be useful with providing initial alignment at the start of a line following run ensuring that the robot is positioned as straight as it can be. 
This is a basic two sensor layout which can be very successful but the line follower typically has low speed as it constantly has to hunt for the line it's following.

Adding a third central sensor provided focus, reduces hunting and increases the speed possible. 

As with the commercial example above, this is an eight sensor bar. If the line is wide enough then the two central sensors can be the focus, but if it is a narrow line, then ignoring one of the outlier sensors and using the fourth sensor as the focus can help performance.

A nine sensor commercial sensor bar is unusual, but automatically provides for a central focus sensor. The wide sensor bar provides for an increased sensor sweep area when negotiating corners or having to perform line finding.

This is an enhanced nine sensor arrangement with a dense focus in the centre, allowing the robot to line follow using multiple sensors, perhaps not necessarily in the centre, but also has outlier sensors for improving corner performance.
This curved sensor is common n competitive line follower robots, maintaining a focus area and providing depth in the outlier sensors. This is very useful where the robot will be encountering many corners in quick succession.


This final layout is more extreme and might be more at home in a commercial robot but can still be useful in smaller robots. The central sensor bar provides the focus and the core steering input. The lead bar provides advance information to allow the controller to take predictive actions, and the trailing sensor bar provides some alignment information to help reduce crabbing and hunting of the robot as well as aiding aligning the robot in a straight line at the start.


High Resolution Cameras

      While they can require significantly great processing power in a robot controller, the cost of adding a camera can be very modest and equivalent to a point sensor array. The processing may be more intense but effectively provides the same level of  guidance as a multilevel array giving a degree of lookahead absent from single line sensors. Cameras can be mounted away from the surface of the course so can avoid being snagged on a 'speed hump'. Using cameras can give a very high quality of control but does require significant investment in learning to implement in code. A variation on this is to add a pan feature to the camera to provide additional lookahead capability.
Wide angle cameras such as this can provide a good view for line following but some compensation for the lens distortion might be needed for accuracy.


Combinations

    Combining all these may be difficult, but a few would be very useful.  Wall following can be a complete solution, but including it with the others for collision avoidance makes the extra points more likely and gives greater confidence in increasing the speed. Line following can achieve the whole navigation of the course, but adding the dead-reckoning information to it can aid in speed control, accelerating the robot from the start, slowing as a corner approaches and accelerating afterwards. Without knowing where the 'speed bump' is, a robot either must moderate its speed throughout or potentially risk crashing, however dead-reckoning can add a suitable speed reduction to safely navigate it. 

Memorising and recall

    Having completed one successful run of the course (we will all be successful!!!), we should have enabled our robot to do it again just as easily, but with the extra knowledge of having done it once. Recording the robots good run means that without sensors it should be able to do it again and perhaps faster. The distance to the corners is known, the 'speed bump' has been located and where the robot can and can't run at full speed determined. 
The methods of recording a 'good' run are varied but the course isn't complicated so a small array of control points may suffice.

What will make for a good robot for this challenge?

     The Lava Palaver is one of the challenges and going all out to win just this one thing may be the sole objective, but in PiWars, a robot chassis will need to be adaptable to the other challenges.

    Adding a line follower array attachment will be perhaps the easiest option, but some mechanism may be needed to allow it to navigate the 'speed bump', fitting it with a hinge and either a roller or idler wheel for the time it is in contact with the 'speed bump'. Fitting this hinged part with a detector would also inform the robot that it had found the bump. Line following competitions sometimes feature quite extreme 'bumps' which delicate high performance robots just get on with.  

    Placing the array well in front of the robot with this mechanism would also perhaps give the robot a small amount of time to decelerate to navigate the bump safely. However, placing the array far in front of the robot may be a problem for steering depending on the technique involved. 


A few mock-up pictures of a suspended sensor running on ball castors. The spring provides suspension to hold the sensor bar down as well as accommodate the rise and fall of the bar.


    A robot can be up to 300mm long in its base configuration, longer than half the width of  the course so a mecanum wheel equipped robot could find itself colliding with the sides of the course at corners. Using skid or differential steering would offer a robot the chance to steer precisely but only if  it was to slowdown to do so at corners. Ackermann steering would give the best control over the course at speed, but might prove problematical to use in the other challenges. One thing which would be consistent is that full length robots with attachments will be at a disadvantage on this challenge.

Remember: 70% of the points are available just for finishing the course without errors three times in 5 minutes, which isn't fast, so just that would be a good result for any robot entrant.

It's not certain, but I suspect East Devon Pirates will have a camera's eye view of the course with skid steering :)  There's code out there we've used before if you want a look.  uggoth/EastDevonPirates2024: Work towards Pi Wars 2024 by East Devon Pirates (github.com)
 

Sunday, June 12, 2022

Zyderbot Architecture

 Zyderbot is very modular and the parts have been assembled to work together around ideas put in place early on in the competition. This is a brief overview of what it comprises. 


The central chassis, as described in previous blogs. houses the controller Raspberry Pi and it is this which forms the central control and communication hub of the robot. 

A VNC connection to this Pi is used to connect to it from a laptop and programming is done using the Python IDE or Thonny. The controller Pi also runs the camera, support for which is built into the Pi.

The rest of the robot platform is modularised to provide dedicated functions, there are two groups, the main chassis controllers and the attachment controllers. As this is our first entry into PiWars, we've designed something which is reusable and the design and code is on Github. 

The main controller runs a command queue, onto which commands can be placed, either from an onboard file, as running a script, from the command line as direct input, or as a response from a separate controller, which in this case is either a Pico or an ESP32.

For autonomous processing, the controller reads a script file and runs commands to either take actions or invoke further autonomous actions, such as running a trough filling hopper or picking an apple. 

A motion command will be sent to the Motor Controller Pico which measures distance and actuates the four chassis motors. 

For Remote Control operation, an ESP32 is used with a PS3 handheld controller to submit commands to the controller, which are passed onto the Motor Controller, providing the necessary control.

For audio input, a separate Pico is used to listen on a microphone, interpret the audio signals it receives, and then pass these on to the command queue.

The Camera is invoked by commands to enable seeking and following operations, itself issuing commands back to the queue to act on received information.

The attachment controllers are there to enable easy integration between the chassis and the attachments, running all the attachment motors, servos and sensors so relieving the main controller of that burden and providing a division of labour.

For each PiWars challenge, an attachment is provided, to a standard mounting specification, power supplied from the batteries as a nominal 12V and communication to the Pi controller is over USB, which also supplies controller power an enables coding on the attachment controller from the central Pi.

There's a lot of code around this, as well as some direct handshake signals to get the timing right, but it's a good platform to take forward into future projects and competitions.

Saturday, January 29, 2022

S.L.A.M

Simultaneous Locating And Mapping summary 16/Jan/2022

Actually, there’s not a lot of mapping, as we build the arena, so we hopefully know where everything is, but locating the robot within the arena is a big deal in PiWars 2022 as there is a lot more stuff about than in 2021. 

General concept: stereo cameras and beacons.


Beacons

The logic chain ...

  • You need identifiable landmarks in a known location.
  • How do you pick them out from the background clutter? If you use LED beacons then you can drastically underexpose the image, leaving only the LEDS showing.
  • How do you identify them? Use different colours.
  • Why not a modulation? Because you have to do this fast on a moving platform, you can’t afford the time to observe the beacon over a time period to see changes.
  • What colours? Well, it turns out that the obvious RGB colours have a problem, which is that the Green is too close to the Blue for rapid distinguishing, so just Red and Blue then.
  • How high? First guess was on the ground with the cameras underslung (leaving the robot top completely clear for attachments). But what about the sheep and troughs obstructing the view, let alone attachments hanging down? So current guess is 110mm up. That means we can have the cameras on the back of the robot unobstructed.
  • What if that’s wrong? They are mounted on 8mm square section carbon fibre tube, so if we need them higher up, we just use longer tubes.
  • What kind of LEDs? First we chose RGB LEDs. This means that if we change our minds about colours we can just solder in some new resistors and get any colour we like. We started out with clear 5mm LEDs with 3D printed HD Glass diffusers, but why make work for yourself when you can get 10mm diffused LEDs?
  • How many LEDs? Given just two colours and four LEDs you get 16 combinations. Each arena wall has a maximum of seven LEDs (if you include the corners) so can then have a unique pattern of beacons. If we need each beacon to be unique in the whole arena we will have to go to three colours or five LEDs

They are powered at 9V, so could use PP3s, hence the little box at the base


Beacon identification software

    First thought, use OpenCV for both image capture and processing. It’s a bit worrying that it takes 25 seconds to load (not to mention 5 hours to install), but runtime is lightning fast and the loading takes place before the timed run, so should not be a real problem. So we start with a pair of 640x480x3 RGB images (possibly on different computers) captured with OpenCV. 
    We can get 29 frames per second (FPS) capturing stereo pairs on a single computer (the Stereo Pi). However, it turns out that we can process them in a very basic way just with numpy and get a calculation ‘frame rate’ of 1880 FPS, so simple image processing has no real effect on performance. The killer is reliability.     OpenCV just doesn’t control the camera hardware properly. This means that every now and then the image goes green monochrome or the GStreamer is incorrectly invoked. Even after weeks of trying I cannot resolve this, so it’s PiCamera and NumPy for now.

Phase 1

The base image is 640 columns wide, 480 rows high, and with 3 colours (RGB)

Locating beacons
This is done by just looking for at least 5 consecutive bright columns in the image to make a column set.

Measuring the Angle

The dreadful barrel distortion of the lens is compensated for by a cosine formula determined experimentally from calibration images. This is then used to create a lookup table to convert the column number of the middle column to an angle, i.e. the bearing from the camera.

Locating LEDs

Look for at least 3 consecutive bright rows in a column set. Note that the LEDs are separated by quite thick separators so that they don’t run into one another in the image. Produces a set of rectangles in the image.

Determining the colours

Because we only have red and blue, we just sum those colours in an LED rectangle; if there’s more red than blue, it’s a red LED, otherwise it’s blue. Note that using OpenCV and YUV encoding we may be able to reliably distinguish green as well, but can’t do that currently.

Identifying the beacons

We have a database of beacons and their colour codes, so RBBR is a beacon with, from the top, Red, Blue, Blue, and Red, LEDs. The database records their location in arena coordinates (garage is 0,0)
The end result of Phase 1 is a set of beacon identifiers and angles. These are written to a database (currently on the PI Zero, but eventually will be on the central Pi)

Phase 2 - Getting a Fix

Choosing the bearings

From the bearings table we choose those ones to use. We want bearings of the same beacons from both cameras taken at the same time. From those we want the pair of beacons furthest apart to get the best angles, so from those beacons which occur in both images we choose the leftmost beacon and the rightmost beacon.

Calculating the position

This is some trigonometry, using the cosine rule and the sine rule. The result is the location of the beacons relative to the robot. Translating the co-ordinate systems we calculate the location of the robot relative to the arena.

Next ...

PID control of motors using the location delivered above (PID = Proportional Integral Derivative). Planned path will be a series of locations (arena x,y co-ordinates), plus angle (orientation of the robot relative to the arena).

Performance

Cameras

The basic picamera is a very cheap device using a tiny plastic lens. It has bad barrel distortion and you might think that we have to do a complex correction grid, but actually, because of the very specific use case a fairly straightforward correction does the job. So long as the camera sensor is absolutely vertical and at exactly the same height as the middle of the LED beacon the barrel distortion above and below the middle doesn’t affect it.

Timing

Obviously the calculation of location from a stereo pair of images taken from a moving vehicle is dependent on the two images being taken at the same time. Paula has done a study of synchronisation procedures which should solve the problem of clock differences. Because picamera capture cannot be directly triggered (you are picking up frames from a continuous video stream) some more work is required to convert clock synchronicity into camera synchronicity.

Basic Capture Frame Rate

Stereo Pi (= Pi 3), single camera, RGB, picamera
straight capture:  1.7 fps 
capture using video port:  5.0 fps

Stereo Pi (= Pi 3), camera pair, BGR, OpenCV 
capture using video port:  29.3 fps

Single Pi Zero 2 W, single camera, BGR, OpenCV 
capture using video port:  61.7 fps

Geometry Frame Rate

from column compute location
using numpy  1880 fps

Accuracy

This is the big one. To avoid the need for supplementary location systems we need to get pretty close to 1mm accuracy. 10mm might be OK, but 100mm would be a waste of time. At present we are not near that, but there is time for more optimisation and calibration.

Wednesday, January 12, 2022

After the holidays

 While we've all been paddling furiously beneath the water, there isn't a lot to show for the last few weeks.  One under the cover development is the synchronisation of the stereo vision system, which is combining the output from two cameras connected to two independent computers. 

I've slightly edited this to fit, but this is the detailed work team member Paula did as the solution. I'll leave most of it as Paula's own words.


Executive Summary:

Over the Christmas period I assembled the hardware and then commenced testing the accuracy of a

Raspberry pi providing a hardware pulse per second, to try to achieve a accuracy of under a

millisecond to enable a pair of raspberry pi zeros that each use a camera to create stereo pairs for

range detection. This was achieved using the pps-gpio overlay module. In the process I discovered

that accuracy can be maintained between reboot or shutdown by using the appropriate driftfile or

adjtime so long as the overlying daemon processes is still enabled.

Object:

To find a way of synchronising external Pi zeros to a hardwire pulse.

Discussion:

A trawl of the internet found that we could use a pulse per second (PPS) provided in the distribution

overlays.

Method:

1: Configure a raspberry pi as a source using a gps receiver dongle to give the 1PPS on a GPIO pin.

2: find software resources to measure the uncertainty.

3: train internal clock using supplied network time protocol with the addition of ntp-tools

4: compare results with both GPS and a RTC chip ds1307

5: report findings, recommendations and conclusions.

Hardware used.

OS Buster 10.5.63 on raspberry pi 2 model A

Real Time Clock using ds1307.

GPS module MTK3339 as source for PPS on pin 4

Important considerations.

The pulse is measured as a leading rising edge on the pin

Temperature is held fairly constant so that drift of internal clock is minimal.

Unfortunately we cannot control the pressure, but for the period of use in the arena ,that we plan, this

may be considered negligible .

configuring the ntpd.conf is quite confusing and detailed to get the best performance.

use a static ip address as using dhcp can lead to higher jitter.

Software changes used

sudo apt-get update

sudo apt dist-upgrade && sudo apt rpi-update

Only enable the firmware update NOT a full update to latest beta os

sudo reboot

sudo apt install pps-tools libcap-dev -y


Optional for Real Time Clock(RTC) module only

enable i2c in


Preferences > Raspberry Pi Configuration > Interfaces

sudo apt install i2c-tools -y

sudo nano /boot/config.txt - Add dtoverlay=i2c-rtc,ds1307 on a new line,

check that the # is removed from dtparam=i2c_arm=on

save and close


Optional for GPS display of satellites etc. only

Preferences > Raspberry Pi Configuration > Interfaces

disable console

sudo apt install gpsd gpsd-clients python-gps -y

Now add the following altering gpiopin to suit.

sudo nano /boot/config.txt - Add dtoverlay=pps-gpio,gpiopin=4 on a new line,

save and close


Now type

sudo echo “pps-gpio” >>/etc/modules


Now reboot by typing

reboot


On restart check that the pps is loaded and being received (once connected and source started).

dmesg | egrep pps

or to see them

sudo ppstest /dev/pps0 ctrl+c to quit

We now have a pulse to align to the internal clock


How does a raspberry pi find the time without an internal real time clock?

In the current kernel on booting a RPi the date and time are taken from a file /etc/fake-hwclock.data

and incremented at regular hourly intervals. If and only if your device is able to receive valid time

sources e.g. Network Time Protocol(NTP) or the newer CHRONYD etc., then internal time is

corrected on receipt of a valid string and continually used until you reboot or shutdown, hence it can

perturb any statistics unless you create a driftfile more later. Incidentally in the case of the Pico, I

believe that there is no saved file hence it starts from a fixed date.

Even if we have no external source we need to define one in ntp.conf and mark it with prefer for the

PPS to work(see below)

Processes:

1) from GPS hardware 1PPS periodic > pin 4 > NTPD/CHRONYD

2) from GPS software NMEA messages periodic > GPSD

3) from GPSD in Shared Memory > NTPD

4) from NTP servers periodic > NTPD

5) from RTC on demand


A) Using the Network time protocol daemon(NTPD) is very confusing in the beginning, but

perseverance is required. Edit the default /etc/ntp.conf file as follows:

# /etc/ntp.conf, configuration for ntpd; see ntp.conf(5) for help

driftfile /var/lib/ntp/ntp.drift

# Enable this if you want statistics to be logged.

statsdir /var/log/ntpstats/

statistics loopstats peerstats clockstats

filegen loopstats file loopstats type day enable

filegen peerstats file peerstats type day enable

filegen clockstats file clockstats type day enable

# You do need to talk to an NTP server or two (or three).

#server ntp.your-provider.example

# pool.ntp.org maps to about 1000 low-stratum NTP servers. Your server will

# pick a different set every time it starts up. Please consider joining the

# pool: <http://www.pool.ntp.org/join.html>

server 0.debian.pool.ntp.org iburst prefer

#server 1.debian.pool.ntp.org iburst

#server 2.debian.pool.ntp.org iburst

#server 3.debian.pool.ntp.org iburst

# Server from shared memory provided by gpsd PLT

#server 127.127.28.0 minpoll 4 maxpoll 4 prefer

#server 127.127.28.0 minpoll 4 maxpoll 4

### Server from Microstack PPS on gpio pin 4 PLT

server 127.127.22.0 minpoll 4 maxpoll 4

fudge 127.127.22.0 refid kPPS

##fudge 127.127.22.0 flag3 1

#next line just so we can process the nmea for string offset note invert value

from ntpq PLT

server 127.127.28.0 minpoll 4 maxpoll 4 iburst

fudge 127.127.28.0 time1 +0.320 refid GPSD flag 1 1 stratum 6

#### end of changes PLT

# UK pool servers

pool uk.pool.ntp.org minpoll 10 iburst prefer

# Access control configuration; see /usr/share/doc/ntp-doc/html/accopt.html for

# details. The web page <http://support.ntp.org/bin/view/Support/

AccessRestrictions>

# might also be helpful.

#

# Note that "restrict" applies to both servers and clients, so a configuration

# that might be intended to block requests from certain clients could also end

# up blocking replies from your own upstream servers.

# By default, exchange time with everybody, but don't allow configuration.

restrict -4 default kod notrap nomodify nopeer noquery

restrict -6 default kod notrap nomodify nopeer noquery

# Local users may interrogate the ntp server more closely.

restrict 127.0.0.1

restrict ::1

# Clients from this (example!) subnet have unlimited access, but only if

# cryptographically authenticated.

#restrict 192.168.123.0 mask 255.255.255.0 notrust

# If you want to provide time to your local subnet, change the next line.

# (Again, the address is an example only.)

#broadcast 192.168.123.255

broadcast 192.168.1.255

# If you want to listen to time broadcasts on your local subnet, de-comment the

# next lines. Please do this only if you trust everybody on the network!

#disable auth

#broadcastclient

#end of file /etc/ntp.conf

B: As Real Time Clocks are not provided on the board of raspberry pi’s

we need to add as in the options above, but to read and set we use

an old tool hwclock as I find the latest tool timedatectl a pain.

to set the time for the first time use:

1: sudo hwclock -w this will take the current time from the Rpi>RTC

or 2: timedatectl set-time “yyyy-mm-dd hh:mm:ss”

To read use

1: sudo hwclock -r

or 2: timedatectl status

you have to fiddle about with hwclock-set

sudo nano /lib/udev/hwclock-set

comment out the following lines to look like:

#if [ -e /run/systemd/system ] ; then

# exit 0

#fi

save and return

Now we can compare results, but for more consult the spell foundry webpage above.

To casually look at the RTC performance use

timedatectl status

But we really need to make the system learn the drift characteristics of the RTC clock to do this we

run the system for days and be connected to the internet, then use the /etc/adjtime file to store the

results it requires a minimum of 4 hours before it records any value!

use periodically over a few days

sudo hwclock —w —-update-drift -v

There are other parameters we need to change if running independently of the internet, that are

outlined on the reference below.

Results:

After an hour I get these from /var/log/ntpstats/loopstats


Which is as good as we can get with a pi and GPS with limited view of satellites. Note: the vacillating

-+ of the accuracy reading in seconds indicates a narrowing of the measurements, further narrowing

will take many hours.


and using gps tool

gpsmon -n (exit with q then return)


Conclusions:

The internal timing on a raspberry pi are not sufficient to maintain the needed 1 millisecond

accuracy for our purposes.Just the change in ambient temperature or pressure is enough to thwart

our goal in stand alone mode, the use of the ability to use a 1PPS seems to be the way forward. The

results speak for themselves when compared with both the raw data from either NTP and GPS,

disciplining the local clock drifts before we launch would be sensible to maintain the accuracy

required by using the above techniques.


Further reading:

References:

1: David Taylor’s page https://www.satsignal.eu/ntp/Raspberry-Pi-NTP.html

and additions from corespondents on that site.

2: John Watkins’s spell foundry on https://spellfoundry.com/docs/setting-up-the-real-time-clock-onraspbian-

jessie-or-stretch/

802.1AS - Timing and Synchronisation https://www.ieee802.org/1/pages/802.1as.html

Paula Taylor 2022109

Friday, December 17, 2021

Reporting from the cabin 2


The meeting was an opportunity to put some plans and dates in place, so we know what dates we need to get things working by, ready for testing, and of course ready for videoing.

1. Finish research and agree approach by end of January

2. Complete robot component design by end of February

3. Complete robot construction by end of May

4. Complete testing and ready for video for end of June.

Seems plenty of time but then we all have other projects we're working on.

Having made some sheep, we played around with how we could gather them in and move them about, mainly with a few bits of wood and patting the cardboard about, and found we could get quite a lot done that way. Scaling this up to a practical robot attachment we got an idea we could make and test.


This is very much in keeping with what we can make so prototypes will be constructed to try out for next time.

In keeping with the Shepherds Pi challenge, we've also acquired a whistle and microphone for issuing commands to 'rover', so it's likely a fair bit of annoyance will be caused with loud whistles for testing.


And just to keep the theme going, a shepherds crook which might form part of a gate opener and sheep prodder when we have a better idea of what is needed there.


In a previous blog, we had pictures of the cattle feeding hoppers in design and now they have become reality, though still in need of a connecting bracket to the mounting plate. 


We still need to make a funnel to direct the feed sideways to the trough, but this part is well underway for having it's first solution. A second solution is not out of the question if it's better. Quite obviously we need a cable management solution to!

That's it for now,  a break until the new year though I'm sure we'll all have designed or made something in between, and videos of mass hopper emptying as well sheep herders to look forward to. We'll stop using the pretty yellow and green plastic as well, looks too good for prototypes so back to more boring colours, we'll bring them out again for final construction.